
Introduction
OLED (organic light-emitting diode) displays, contrary to Character LCDs, are usually made up of more pixels and in this case, are aimed towards displaying pictures rather than just text. Accordingly, they are a bit more complicated to set up and use successfully. On the other hand, displaying images is a huge boon and is useful for a number of projects.
Tools
Parts
-
-
Before you complete this tutorial, make sure that you have completed the Feather M4 Express and I2C tutorials first.
-
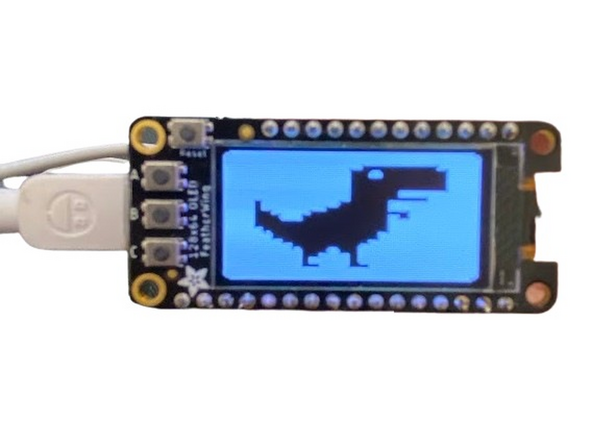
You will also need a 128x64 OLED display. No jumper cables will be needed.
-
-
-
To connect the display and the Feather, simply place one on top of the other, lining up all the pins, or use the Doubler that may be connected to both already. The Doubler will connect every pin on one side to every pin on the other, effectively allowing you to stack a FeatherWing or similarly designed device on a Feather without usual drawbacks.
-
If using the components on top of one another, it can be a little difficult to read the labels on the Feather with the display right on top. If for this reason or another you'd like to move the display elsewhere, just make sure to connect the power, ground and I2C pins correctly. Check Adafruit's pinout page.
-
-
-
To use CircuitPython for this tutorial, you will need these libraries from the adafruit bundle: adafruit_bus_device, adafruit_displayio_sh1107, and adafruit_display_text. These are all found in the common library bundle. Check the Feather tutorial for a refresher.
-
In addition, you will need to import some libraries to initialize your I2C protocol. Make sure to include these statements at the beginning of your code: import displayio -- import board -- from displayio import I2CDisplay as I2CDisplayBus -- import adafruit_displayio_sh1107 -- import time
-
Important to note in your code: The OLED display communicates with I2C. Accordingly, if you have any other I2C components being used at the same time, make sure that you include pauses like time.sleep(.1) between actions. See the reasoning for this in the I2C tutorial.
-
Make sure the version matches your installed CircuitPython version.
-
-
-
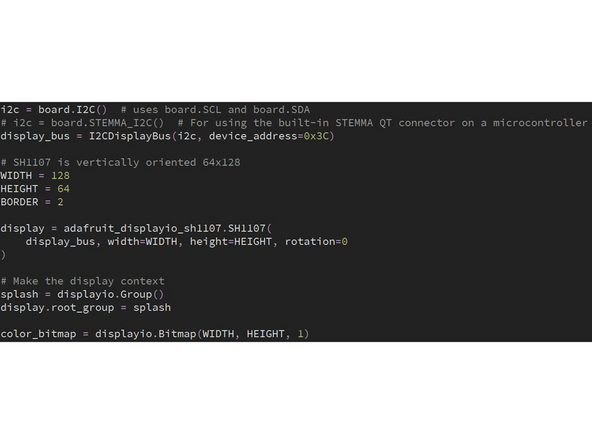
Using the display can be confusing. It requires a very specific setup and then acts by using some new concepts. To set up the display, import everything needed and then address the board at the correct location: display_bus = I2CDisplayBus(i2c, device_address=0x3C).
-
After addressing the board, initialize it and define the width, height, and border by using display = adafruit_displayio_sh1107.SH1107(display_bus, width=WIDTH, height=HEIGHT, rotation=0 You can set the WIDTH and HEIGHT variables beforehand or manually include them in your code.
-
To display an image on a black and white OLED display, it must be in the bitmap (.bmp) format. Place these files in the root of your CIRCUITPY device so that it can find them. These must be found by defining them as bitmaps: bitmap = displayio.OnDiskBitmap("/filename.bmp").
-
-
-
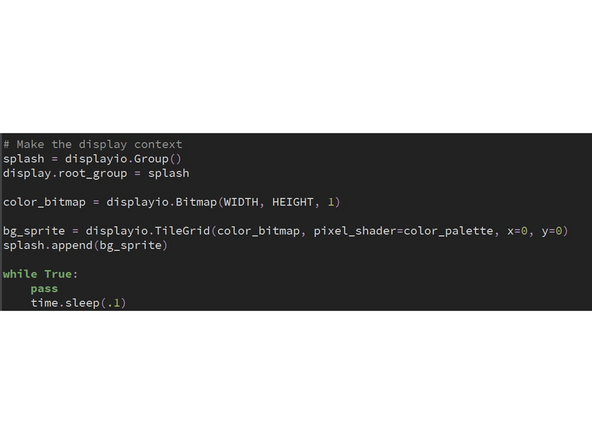
After including your bitmaps, these must be represented as TileGrids to hold the bitmap in the device's memory: tile_grid = displayio.TileGrid(bitmap, pixel_shader=bitmap.pixel_shader).
-
Finally, to actually put these TileGrids on the display, they must be included in Groups. These groups act as sorts of arrays where each new item added is another image or text on top of the last. To define a Group: group = displayio.Group() and to display it: display.root_group = group.
-
To add items to a group, use group.append(tile_grid), or to specify location group.insert(index, tile_grid). For text, define the area as text_area = label.Label(terminalio.FONT, text=insert text here, color=0xFFFFFF, x=8, y=8) and add them into a group the same exact way, with text_area as the item to be added.
-
Add a while True loop with nothing in it to make your image stay on the screen. You can use pass or any time.sleep to do nothing every loop. For more detailed information and some other functions, see the CircuitPython documentation for the sh1107 library.
-
To make sure it's working properly, check out Adafruit's example code. If you get errors or are otherwise stuck, AI like ChatGPT 4 or Perplexity can be surprisingly effective resources for code and debugging.
-
-
-
To earn a badge for the display, find an image that you'd like to display. Make sure it's in the .bmp format (online converters may be helpful) and equal to or smaller than 128x64 pixels. Otherwise, it may not fit properly on your screen and look wrong. Save your image as a unique filename in your Feather's root directory.
-
For the challenge, manipulate your code to move around your image over time. Additionally, add some text that appears over or next to your image as a label.
-


128x64 OLED Display: Quiz