
Tools
Parts
-
-
Before you complete this tutorial, make sure that you have completed the Feather M4 Express tutorial first.
-
You will also need a thermal camera, the subject of this tutorial.
-
Thermal cameras take an image made up of pixels, but represent each pixel as a temperature instead of color data. We can later represent this in grayscale or with a scale of blue to red to represent heat levels that the camera captured. Note that our camera is extremely low resolution, 8x8, so any images that we produce will be ill-defined.
-
-
-
This component works by taking a picture when called and transmitting it as temperature values in the string data type. These are reported as "arrays", but are really just strings formatted to look like an actionable array. As such, we'll need to manipulate the data some in order to meaningfully use it. Find more information on strings in python.
-
To connect the camera to the Feather, you can either stack it on top of the Feather or use a Doubler. Since the camera is a FeatherWing, it's designed for maximum compatability with the Adafruit platform.
-
The headers on top of the Feather may also become useful later, so we'll want to keep them available; hence the Doubler. For information on the Doubler, check the OLED Display tutorial.
-
-
-
To use CircuitPython for this tutorial, you will need these libraries from the adafruit bundle: adafruit_amg88xx.mpy, adafruit_bus_device, and adafruit_register.
-
Make sure the version matches your installed CircuitPython version. Issues have been found using this camera with earlier versions of CircuitPython. Make sure your Feather is at least updated to 8.x.x, or preferably 9.x.x.
-
-
-
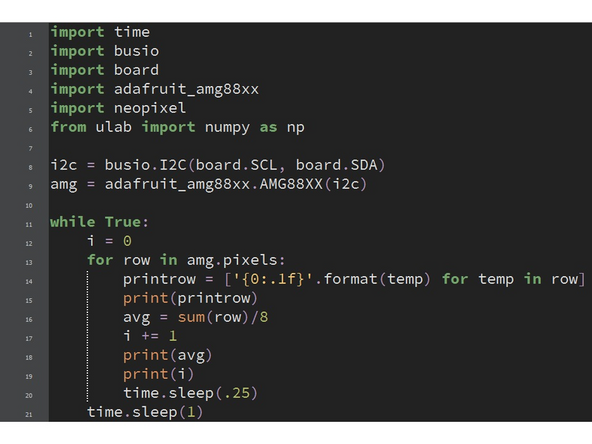
Since the thermal camera operates over I2C, we need to define it as normal. Use busio (learn more) and board.SCL/SDA to define an i2c variable. After initializing I2C, we need to invoke the new library to define the camera as its own variable. The format for this is variable = adafruit_amg88xx.AMG88XX(communication method).
-
After the device is initialized, we can call it with some specific properties. variable.temperature returns the specific temperature of the sensor itself. variable.pixels returns 8 strings with 8 values each, one for each pixel reading that the camera takes. This can be represented all at once or separated.
-
Use Adafruit's example code to make sure the sensor is functioning properly, then write your own.
-
For more information on wiring or coding, check out Adafruit's Learn page for this FeatherWing.
-
-
-
To earn a badge for this component, we'll need to do something meaningful with the data. Since there's not much more to explore with the camera, you will try to export the results and format them into something more usable.
-
One way to accomplish this is saving the data into a .txt file on the Feather, then importing this file into MATLAB and representing it as a graph. To save code to a .txt file, you must enable writing to the Feather's memory. Follow this specific Adafruit guide to accomplish this. (You may use any digital pin since the Feather doesn't have D0).
-
This page on a syntax for exporting may also be very helpful. Remember to execute commands in the REPL, which can be accessed by interrupting running code with CTRL+C and pressing any key.
-
To exit the write mode, get into the REPL and use the OS library built in to rename the boot file. Use import os and os.rename("boot.py","boot.bak"). This will change the file format of the boot file so the Feather doesn't see it on startup. Reset the Feather and you can save your file again.
-
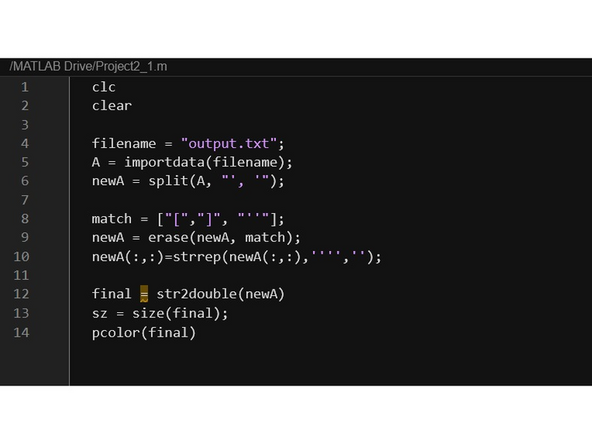
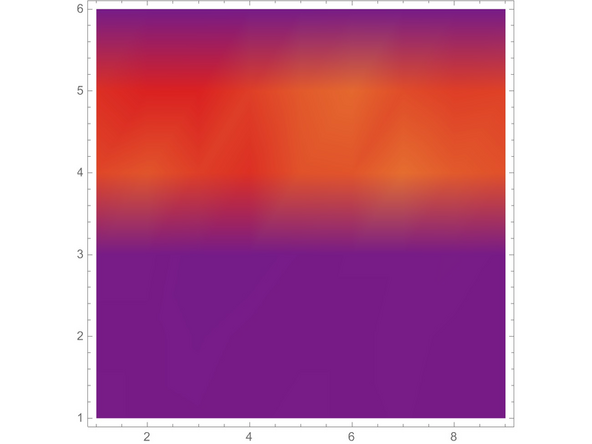
One way to process the exported file is using MATLAB, such as the example code in the second image. This code parses out the mess in the strings that get exported, converts them to usable double data types, and represents them as a pseudocolor graph. Learn more about these graphs on the MATLAB documentation page.
-
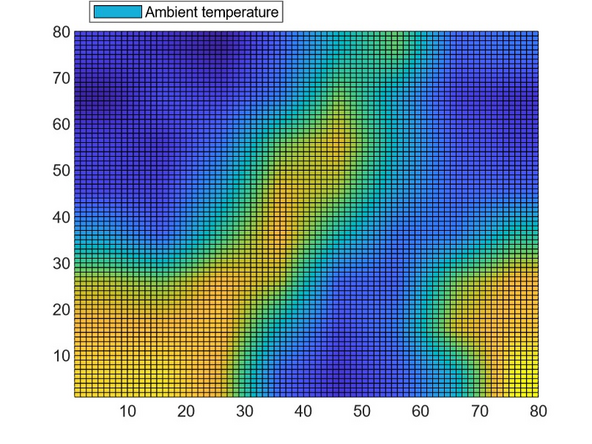
If you want to test to see if your code is working properly, try taking your sensor to the soldering station and holding a hot iron above the sensor. If it's held at an appropriate length, the image output may show an outline of the image by its heat signature. Images of a hand with an extended finger and of a ceiling light are shown.
-
The hand image first upscaled the data to have a higher resolution, using the imresize function built into MATLAB. The line could look like this: C = imresize(final, 10, 'bilinear'); pcolor(C)
-


Thermal Camera: Quiz