
Introduction
The Character LCD, or Liquid Crystal Display, Screen allows you to display text data in a 16x2 character grid. It has widespread applications for integration with other sensors and controllers. Other uses for a Character LCD screen include displaying sensor data, showing calculations, sharing settings and version information, and displaying text anywhere else you'd need it. Below is a link to learn more
Tools
-
-
Before you complete this tutorial, make sure that you have completed the Feather M4 Express tutorial first.
-
You will also need these extra components: A Character LCD with a I2C/SPI Backpack already soldered on, and a STEMMA cable that connects the backpack and the Feather.
-
Go ahead and plug in your Feather to your computer and ensure that the bootloader is updated and CircuitPython is on the most recent version. Instructions can be found in the Feather tutorial.
-
-
-
The character LCD works by communicating with the Feather over I2C, a communication protocol. This is done by adding the I2C/SPI backpack module that appears soldered onto the back of the screen. You can learn more about I2C and how it interacts with CircuitPython here (highly recommended).
-
Without the backpack, this screen would require many different jumper wires and need to define every single connection individually in Python. Since we have the backpack, it simplifies to the STEMMA connecter and we can communicate with it much better.
-
To connect the LCD to the Feather, use the Qwiic cable and connect the black wire to GND, the red wire to the USB power output, the blue wire to SDA, and the yellow wire to SCL.
-
-
-
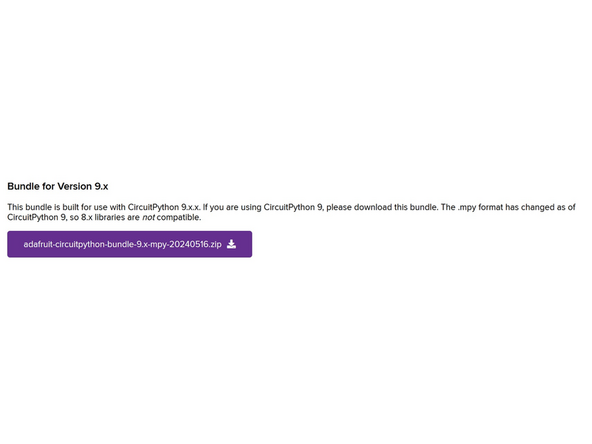
To use CircuitPython for this tutorial, you will need these libraries from the adafruit bundle: adafruit_bus_device, adafruit_character_lcd, adafruit_mcp230xx, and adafruit_74hc595.mpy.
-
These should once again go in the lib folder found in the root of your CIRCUITPY device. If you need a refresher on installing libraries, follow the Feather tutorial.
-
-
-
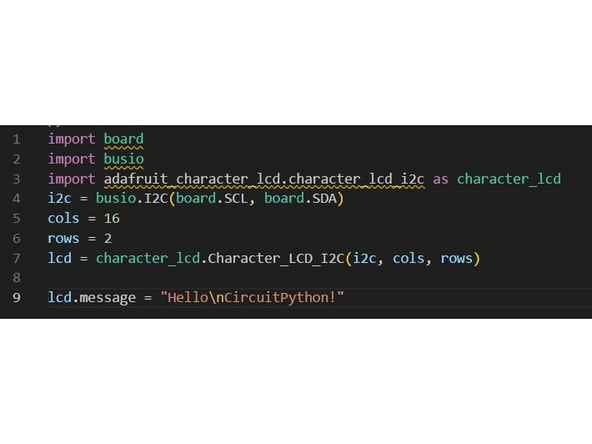
To display a message on the screen, use lcd.message = "text". Insert \n at any point during your message to move to the next line. Remember your text has to be 16 characters or lower for each line. To clear the current text, use lcd.clear(), and lcd.move_left/right() will scroll one character at a time.
-
For more information on strings, the datatype that character LCDs work with, visit this link. Python is extremely versatile for strings.
-
Example code is shown in the picture
-
For more built-in functions, visit Adafruit's tutorial page (ignore everything until it shows a picture of the screen saying "Hello Circuitpython")
-
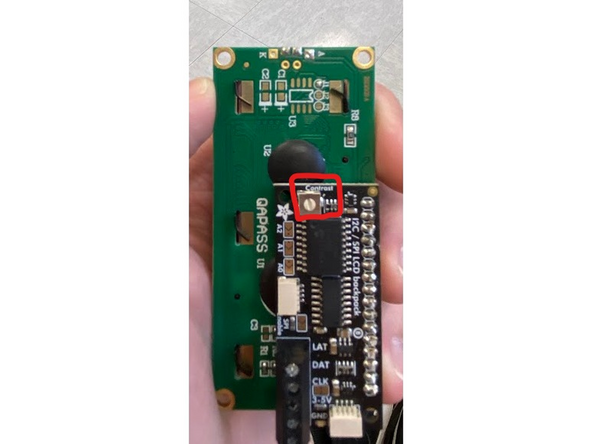
If everything is connected and the screen is turning on, but you can't see any text - you may need to adjust the screen contrast. This can be done by turning the potentiometer on the back of the backpack with a small screwdriver.
-
-


Character LCD Screen: Quiz