Introduction
The VNA is an extremely sensitive and expensive instrument. Please read all instructions and heed all warnings BEFORE you use it. If you are unsure, ASK!
Outline:
Connection Techniques
Static Control Procedures
Because the instrument is so sensitve, users must be aware of proper static control procedures to avoid damaging the machine. The current setup utilizes a static control strap that is attached to the chasis ground of the VNA. Users MUST put this strap on before operating the machine, especially if they will be touching the ports or the connectors. This includes if the user is only manipulating the DUT. Static discharges into the ports could permanently damage them.
VNA Peripherals
This VNA utilizes Windows 2000. The keyboard and mouse provided with the system utilize the PS/2 connection protocol, which is NOT hot-swappable. This means that the keyboard and mouse must be connected BEFORE booting (Before the system POSTs) in order to work. If you remove the keyboard or mouse while the system is running, you will have to restart it before you can use them.
Methods of Operation
There are 2 different methods of operation available on this model of VNA.
- Use the buttons on the front of the panel. This is usually the easiest and most direct method to interact with the VNA. Simply press the appropriate buttons to change measurements or parameters.
- Using the keyboard and mouse. Another option to control the system is to use a keyboard and mouse. All of the physical buttons on the machine are also reproduced on the screen.
-
-
There are 3 ways to change or enter parameters into the machine. To example the 3 methods, we will adjust the center frequency of the measurement. You first need to select the parameter you would like to change by either clicking it with the mouse, selecting it with the rotary encoder, or pushing the button corresponding to the parameter
-
1. Use the keyboard. After selecting the parameter as previously described, type in the number that you want. In the example 121.9. Then type "G" for GHz, "M" for MHz, or "k" for kHz. Here we would type 1 2 1 . 9 M
-
2. Use the keypad.
-
Type in the number that you want to change to using the number keys
-
Type the unit using the unit keys, "G" for GHz, "M" for MHz, or "k" for kHz.
-
3. Use the encoder. If you want to make quick, imprecise changes, you can simply turn the rotary encoder after selecting the appropriate parameter.
-
-
-
Before using the VNA, connect your wrist to the static strap provided on the machine to prevent ESD from damaging the ports
-
Ensure the keyboard and mouse are connected in the back of the machine (they shouldn't be disconnected ever)
-
The keyboard and mouse are connected with PS/2 connectors. This means they are not hot swappable. If you forget to connect them now you will need to reboot the machine to establish a connection.
-
Press the power button on the left-hand side of the machine. It may take some time before you see signs of life. Be patient.
-
Login to the system using the credentials below.
-
Username: agena
-
Password: blank
-
-
-
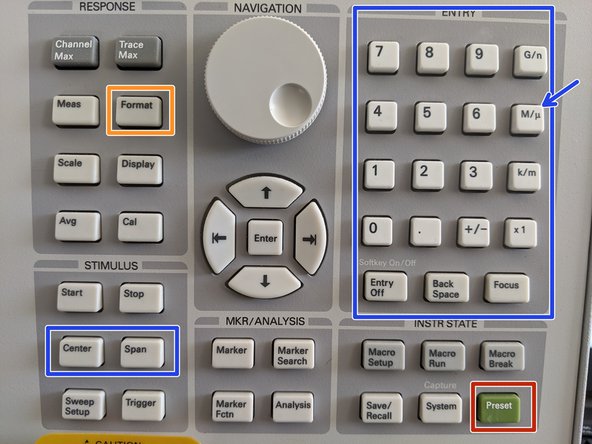
Press the green Preset button on the front panel
-
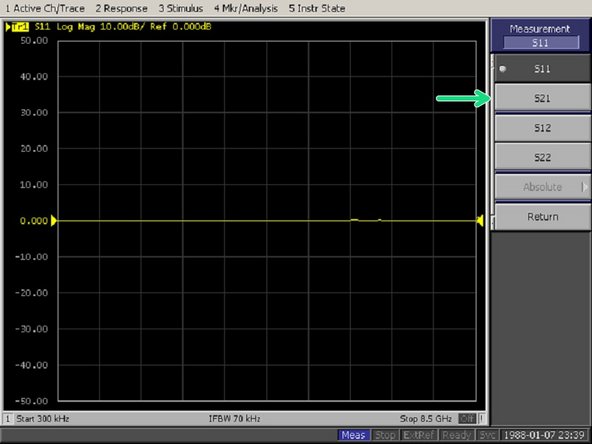
Set the S-Parameter to S21 by selecting Meas and then selecting S21 from the list. (or S12 for reverse transmission characteristics) Again this can be done with the mouse or with the rotary dial on the front of the machine.
-
Change the Axis format by selecting Format and then change to Log Mag
-
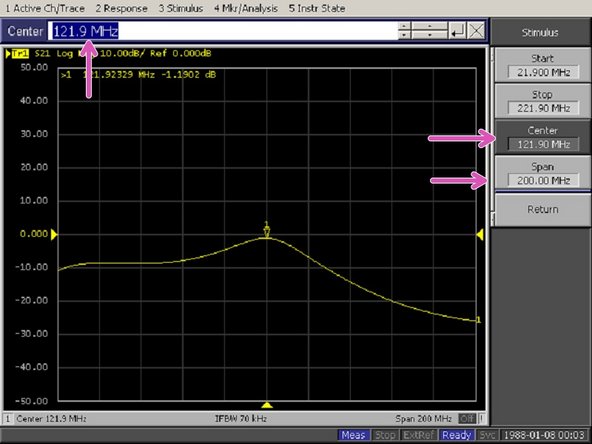
Next we will set a center frequency of 121.9 MHz and a span of 200 MHz.
-
Press Center and enter 121.9 and then press M in the entry section to the top right of the keypad.
-
Press Span and enter 200 and then press M in the entry section to the top right of the keypad.
-
Alternatively you can also use the keyboard to enter these numbers. When entering the frequency unit using the keyboard, type "G" for GHz, "M" for MHz, and "k" for kHz. When using the keypad on the front of the unit, simply press the corresponding buttons on the panel.
-
-
-
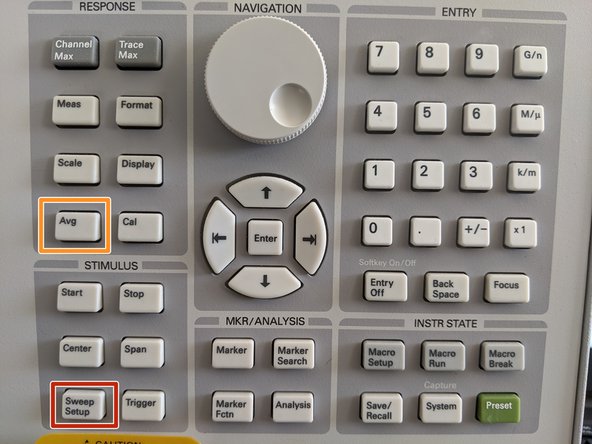
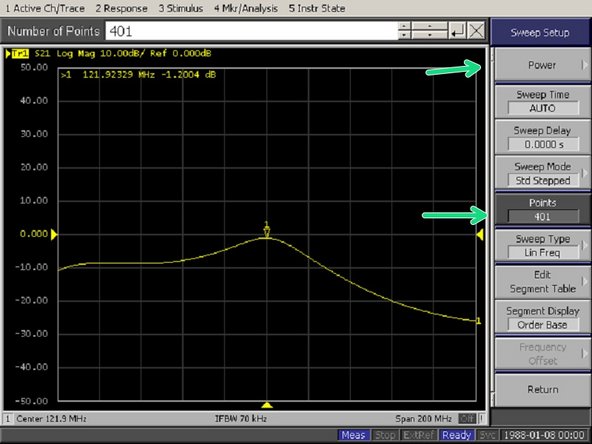
Next specify the number of points per sweep. Sweep Setup and then Points. In the example we have selected 401 pts.
-
To specify the power level, press Sweep Setup and then Power. In the example we have set 0dBm.
-
You can also specify the IF frequency by AVG then IF Bandwidth
-
At this point, you have completed an uncalibrated measurement! On screen, you should see a single yellow trace that represents S21 and the axis should be such that you are seeing a 200 MHz range centered around 121.9 MHz.
-
For calibration instructions, please refer to the calibration guide. For more features of the measurement side of the machine, read on.
-
-
-
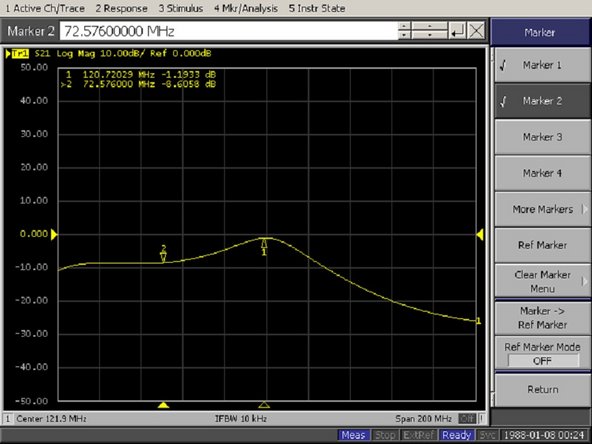
Sometimes you want to know the magnitude of some of the points in your measurement. In order to do this, you can utilize the marker function.
-
Press the Marker Button. You will see a list of markers appear. After selecting one of them, you can use the rotary encoder to move the marker across the screen. A readout of the X and Y value for the marker is provided at the top of the screen.
-
You can also automatically place markers at the min, max, peak, and targets by pressing the Marker Search button, and then selecting which function you want. In the example you can see the marker placed automatically at the peak.
-
-
-
There are two ways to capture data from the machine at present.
-
Using a USB flash drive
-
Saving a Screen Capture
-
-
-
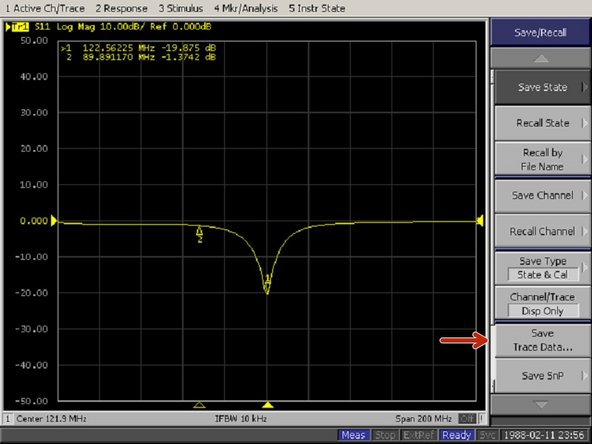
To save a CSV file with the trace information for later use in excel or MATLAB, first press Save and Recall
-
Scroll down to click or select Save Trace Data
-
In the box that pops up, select the save location and select save
-
When done, please make sure to safely eject the USB drive. To do this: press save/recall then select Explorer and then use the mouse to select the green arrow icon in the bottom right corner of the screen. It will not appear until you hover near it.
-
-
-
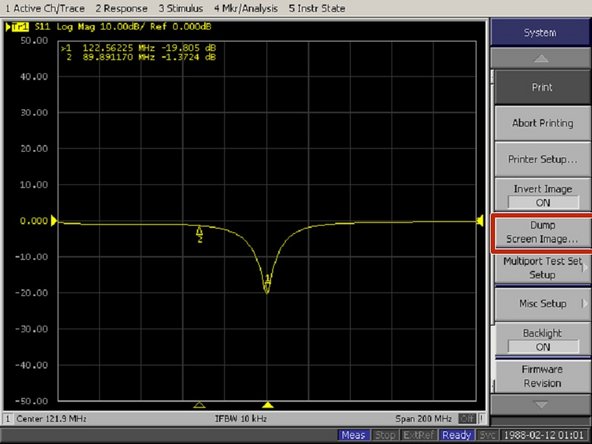
Once the screen you wish to save is loaded, press system (only press this button once. It will save a screenshot of whatever is on the screen at that time, so multiple presses may cause undesirable results)
-
The screenshot is stored in volatile memory, and must be saved as a hard copy. If you turn off the instrument without dumping the image, your image will be deleted!
-
Next select Dump Screen Image in the menu that appears, and select the location you wish to save to
-