
Introduction
PrusaSlicer is the software that takes a 3D model and turns it into a set of commands that 3D printers can follow to generate the 3D model as a stack of very thin layers.
This guide will walk you through importing a model, choosing a printer and filament type, defining print properties like resolution and density, and generating the gcode file needed for use with a 3D printer.
This tutorial is printer agnostic and will apply for all 3D printers in the Maker-E.
-
-
Slicing software most commonly uses the STL file format to generate print files for 3D printers. If you have created a 3D model using CAD, please be sure to export your model as an STL file.
-
You do not need to generate your own 3D models. There are many free 3D model repositories available online. You can download STL files from these websites. Below are several options:
-
-
-
-
-
-
You will need to complete this step every time you log into a new computer. If you have already completed this step on a specific computer then your settings will be retained and you can skip this step.
-
Visit this Google Drive Folder and download the most recent .zip file (the date appears in the filename). Extract the contents which should include a single folder and several files.
-
Now launch PrusaSlicer. You should be presented with a Configuration Wizard window. Close this window and, from the menu bar at the top, choose Help -> Show Configuration Folder. The folder should appear in a separate window. Close PrusaSlicer.
-
IT IS IMPERATIVE THAT YOU CLOSE PRUSASLICER NOW! COPYING FILES WHEN PRUSASLICER IS OPEN WILL CAUSE THIS PROCESS TO FAIL.
-
Open the .zip file you downloaded and copy the contents (three files and a vendor folder) into the PrusaSlicer folder that was opened for you. When prompted, choose to Replace the files in the destination.
-
Finally, launch PrusaSlicer again. You should now see several Prusa printers available within the Printer drop down menu. Also confirm that you see only PLA and PETG filaments available from the Filament drop down menu.
-
If you do not see these printers or filaments listed STOP. You need to speak with a Maker-E tech before you continue. Using the wrong printer or filament settings can damage printers!
-
-
-
Watch this video to confirm that you have properly copied over the settings into the PrusaSlicer config folder. If you copy things properly then you should see all of the Maker-E printers appear. If you do not follow the steps shown in this video then you will be missing several of our printers.
-
Stop and ask for help if you are not able to install all of the Maker-E printers!
-
-
-
Launch PrusaSlicer from any computer in the Maker-E or an ECE lab.
-
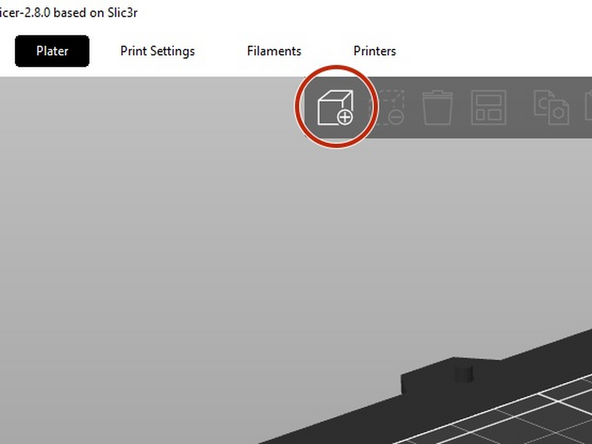
Click the Add button and import the STL file you wish to print.
-
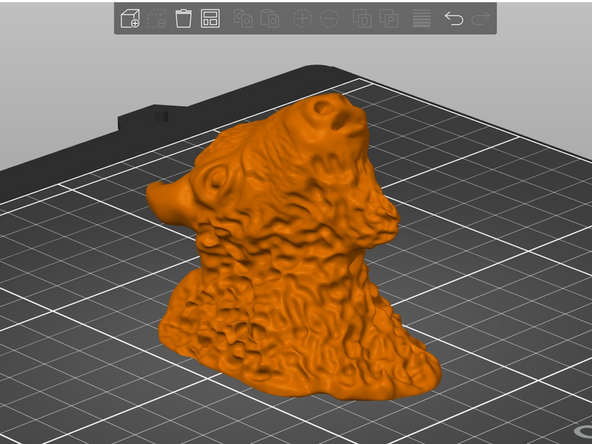
For this tutorial we will use the bisonHead.STL file which you can download here.
-
You should see your model appear on the print bed. We will rotate and move the model in the next step.
-
-
-
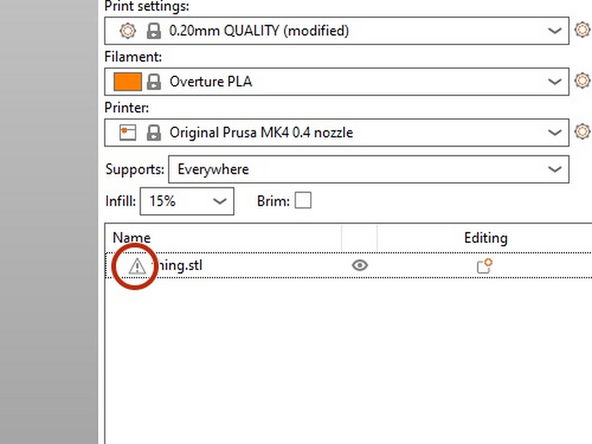
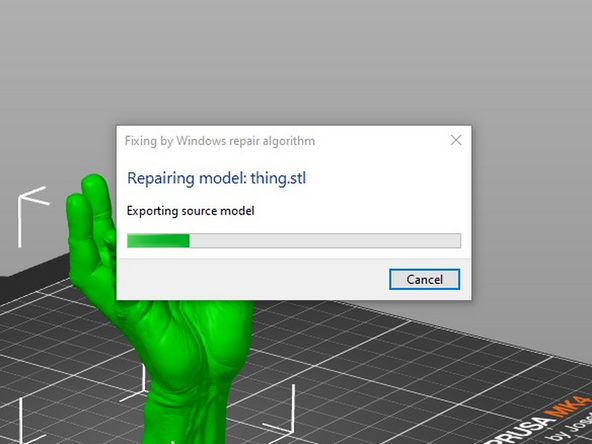
It is possible that the STL file you import into PrusaSlicer could have errors. The software will indicate any errors by displaying a small warning triangle icon beside your part file name.
-
If you see this warning symbol, right click on it to run a Windows repair algorithm. This may take several minutes depending on the complexity of the part and number of errors.
-
When the repair is finished, control will return to PrusaSlicer and the error icon will disappear.
-
-
-
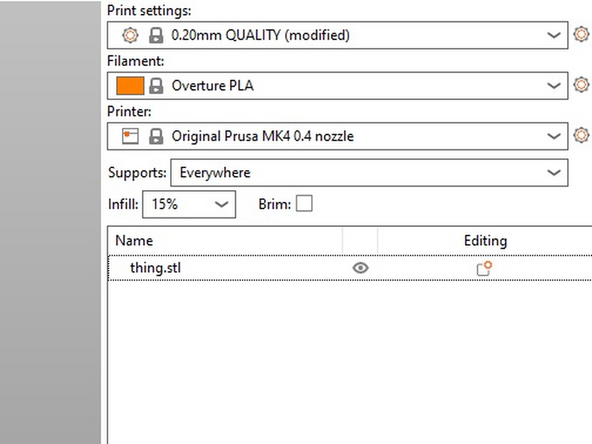
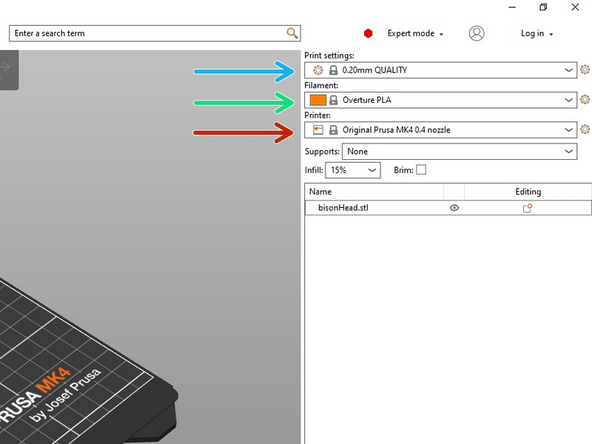
Make sure you know which printer you wish to use for your print. Choose the appropriate printer from the Printer drop down menu. In this example we will use the Original Prusa MK4 0.4 nozzle.
-
Some printers (Prusa MK4 and Prusa XL) support a feature called Input Shaper. This feature can improve print quality while decreasing print time. Feel free to choose this option from the Printer menu if available and desired. We will not use it for this tutorial.
-
Choose the type of Filament you wish to use. Most prints should be created using Overture PLA as this filament will yield the highest quality print and least chance of failure. If you need to print a part with mechanical strength and durability, or for outdoor use, select Overture PETG instead. In this example we will use Overture PLA.
-
Chose a Print setting (layer thickness) that meets your needs. Smaller numbers will result in finer features and higher quality prints. However, higher quality prints will take significantly longer. 0.20mm QUALITY is a good default.
-
Failure to choose the correct printer and filament will cause your print to fail and may damage the printer! BE SURE TO CHOOSE THE CORRECT PRINTER AND FILAMENT.
-
Users may NEVER change any settings beyond those found in the drop down menus on this screen, and support settings (later step). Parameters like temperature, speed, extraction, etc. should NEVER be altered. Users found changing these parameters will have their certification revoked.
-
-
-
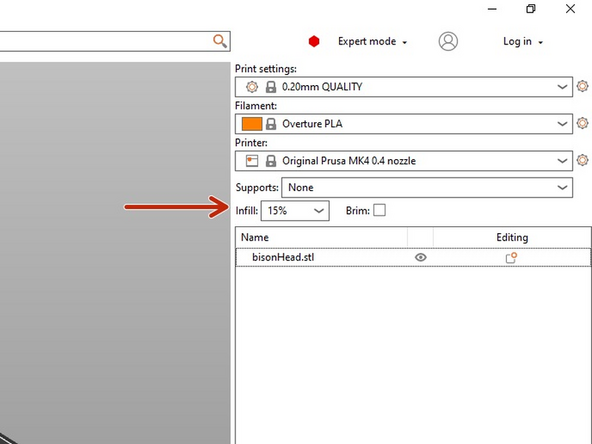
Choose how dense you would like your print. An Infill of 0% will print a hollow shell while an infill of 100% will be completely solid. Higher infills result in more durable parts but at the expense of longer print times and more filament usage.
-
If your print will not require mechanical rigidity and durability it is recommended to print at 15% infill. We will use this value in this example.
-
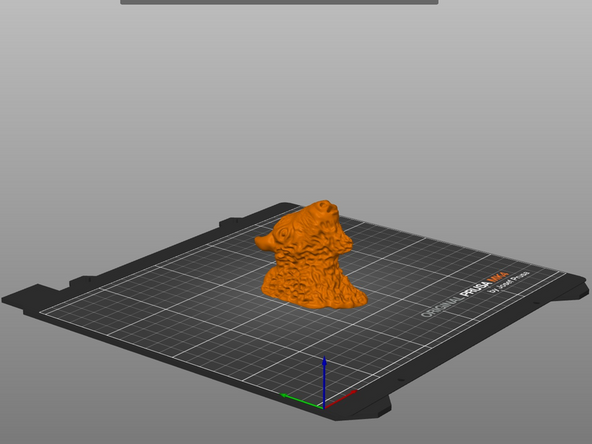
Models should be rotated and positioned in order to maximize surface area contact with the print surface. This will minimize support material (explained later) and ensure good adhesion to the print surface.
-
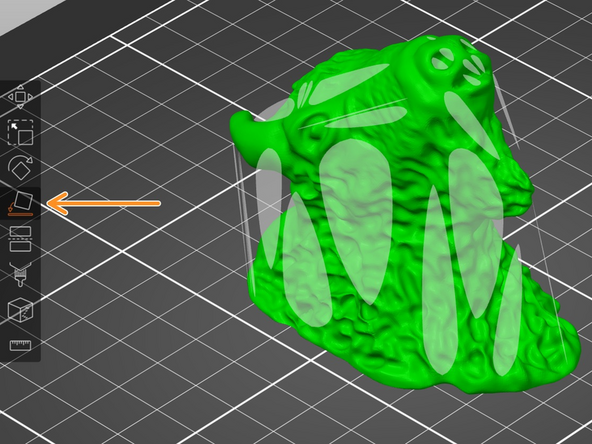
Click on your model and it should turn green. Choose the Place on face tool from the left menu bar. PrusaSlicer will display multiple tangent planes (white surfaces) which you can choose to place on the print surface. In our example the bison head has a flat base and is already placed on the print surface so we will not change rotation.
-
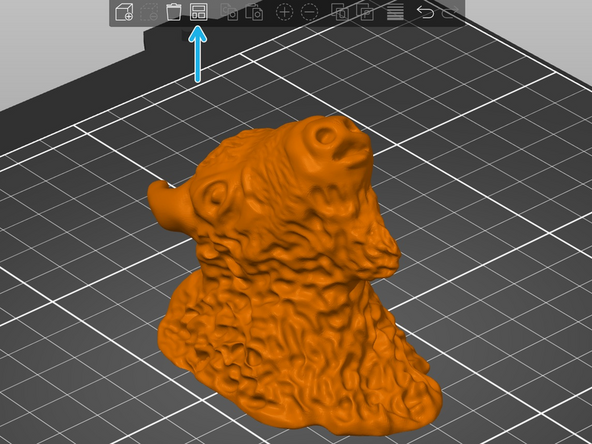
You can also click and drag the part to move it around the print surface. It is recommended to center all prints for optimum print quality and success. Press the Arrange button from the top menu bar to center and arrange your model.
-
When working with the Prusa XL printer, the Arrange button will move your model(s) to one of four quadrants on the bed, NOT the center. This is normal behavior and when using the XL printer your parts do not need to be centered in this case.
-
-
-
To learn about when and why support material is needed you can check out this reference. To summarize: any parts of your model which overhang 45º or greater from vertical will require support in order to print properly. For example, if you were to 3D print the letters T and Y they would require support to print properly while the letter L would not.
-
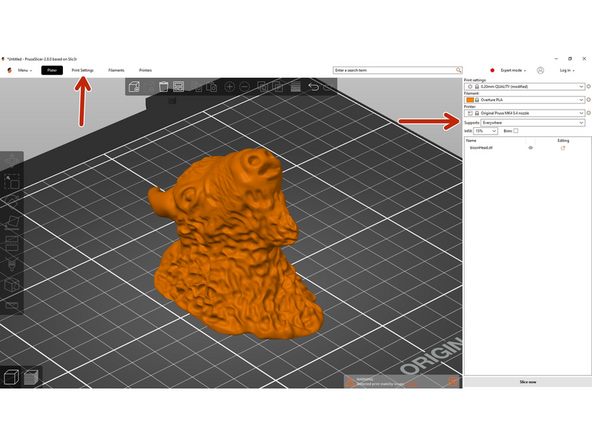
Begin by enabling supports Everywhere from the Supports drop down menu. Then choose the Print Settings menu from the top menu bar.
-
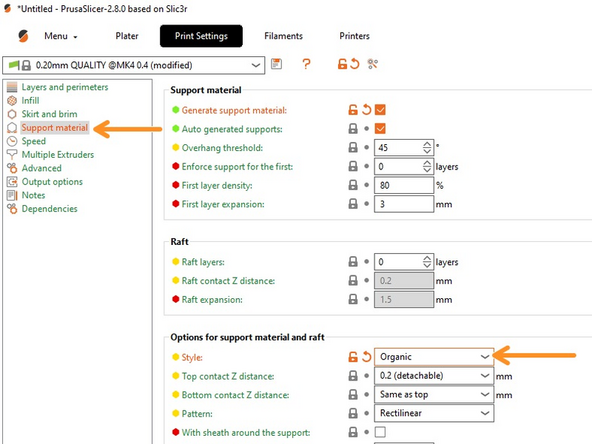
Within Print Settings click on the Support material option in the left column. Find the drop down menu for Style and change it from Snug to Organic. To complete this step, you may need to navigate to the green hexagon with "Beginner" next to it and change it to "Normal" or "Expert".
-
Now click the Plater button on the top menu bar to return to the model view. Click Slice now in the bottom right to add support, slice your model, and generate a preview of the printer tool path.
-
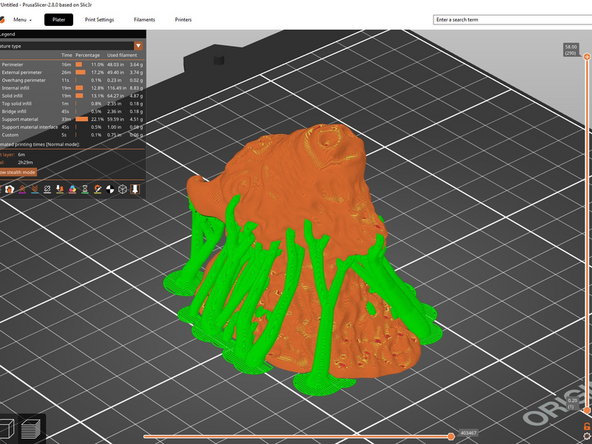
The green trees or branches shown here are the additional support material the printer will add to ensure the model prints properly. These will breakaway cleanly and easily when the print is complete.
-
-
-
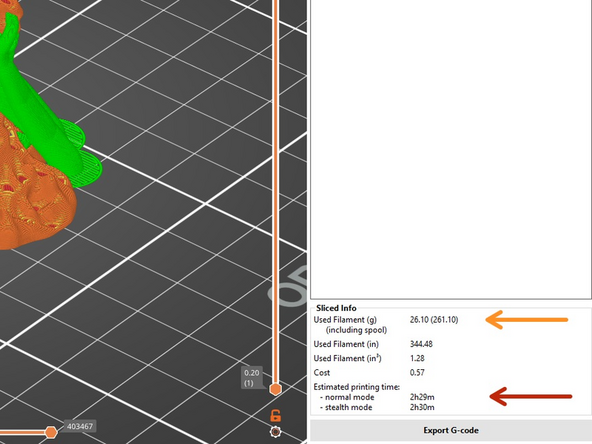
The print preview provides you with useful information:
-
Estimated printing time is shown at the bottom right of the screen.
-
Used filament (in grams) is shown at the bottom right of the screen.
-
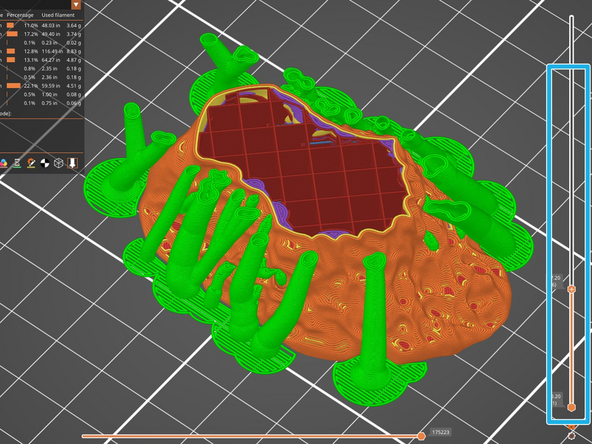
Using the vertical scroll bar on the right side of the screen is helpful to scrub through the layers of your print. Watching how the printer will travel can reveal any potential problems such as internal cavities, missing support, or floating parts not placed on the print surface.
-
In the example shown here we have moved the scroll bar down to layer 86 and you can see the infill pattern (red) which will be printed inside of our model.
-
-
-
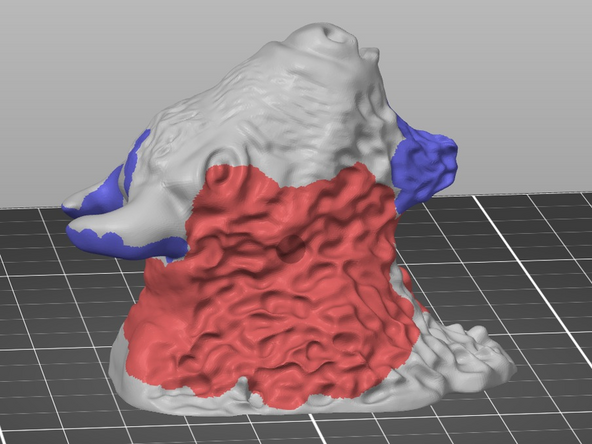
While the default supports will work great to ensure our model prints properly they can sometimes be unnecessary. In the example here the horns definitely need support, as does the chin. However, the rest of the support is unnecessary and will only consume filament and time. It is safe to remove this support.
-
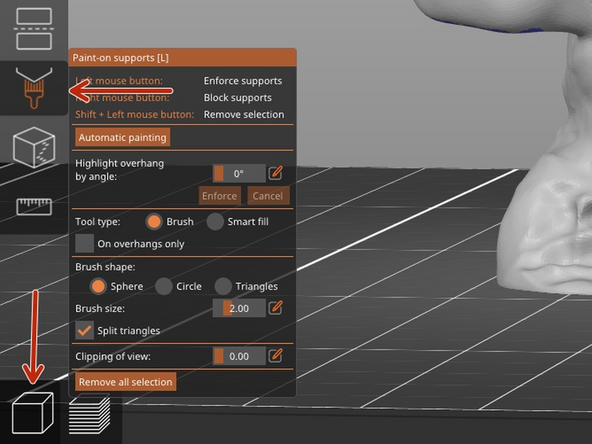
Click the 3D editor view button in the bottom left of the screen to return to model view and then press the paint-on supports button in the left menu to bring up the corresponding window.
-
Now you can left click and paint blue the areas where you would like to generate support. Right click and paint red any areas you wish to exclude support. You can adjust parameters such as brush shape and size.
-
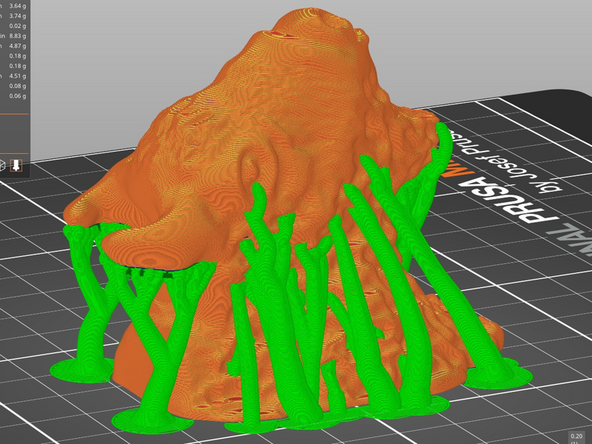
When you're done the result should look similar to the final image here.
-
Once you are satisfied with the support definitions click the Slice now button in the bottom right of the screen.
-
-
-
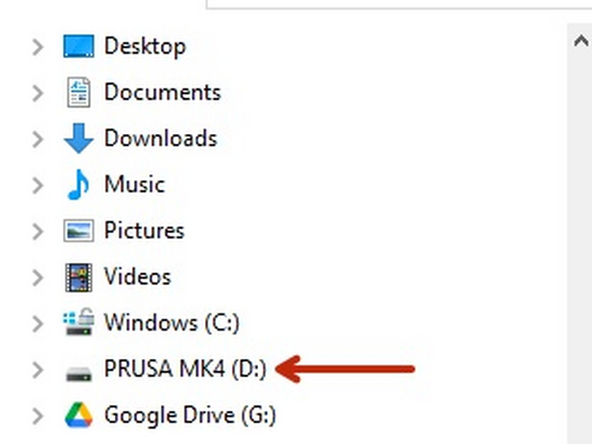
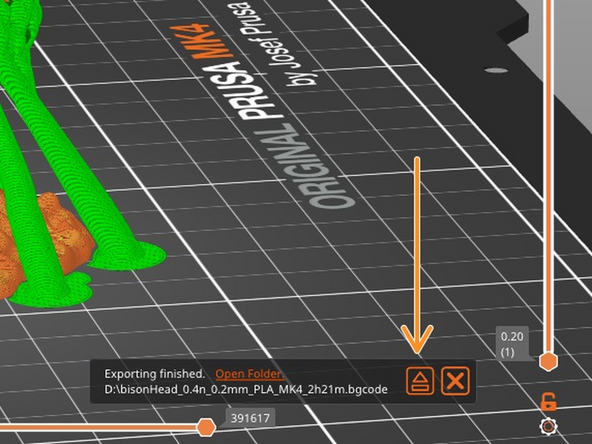
Connect the printer file storage (SD card or USB flash drive, depending on the printer) to the computer. Note the name of the storage should match the printer you are using. In this example we are using the Prusa MK4.
-
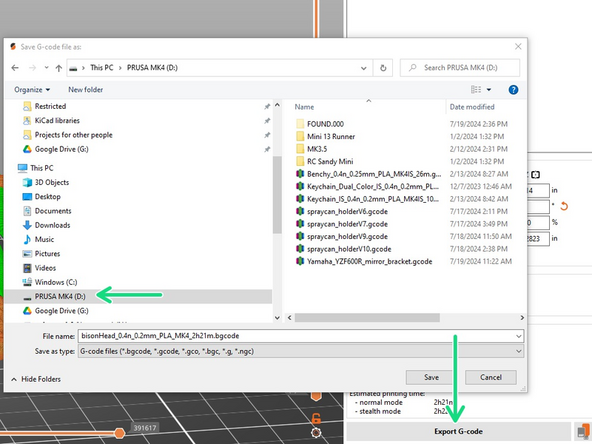
Click on Export G-code at the bottom right of the screen. When prompted, be sure to save file to the storage medium you just connected.
-
Note: you may see a window alerting you about binary G-code. If you are using the Prusa MK4 or Prusa XL printer you can safely ignore this warning and click OK. The Prusa MK3S+ and MakerGear M2 printers should use standard (non-binary) G-code.
-
When the export is complete you should see a window in the bottom right alerting you to this completion. Be sure to properly eject the storage medium by clicking the orange Eject button. PrusaSlicer will tell you when it is safe to remove the device from the computer.
-
Be sure to wait until PrusaSlicers instructs you to remove the storage drive! Removing the drive before it is safe will cause errors in your gcode, problems with your print, and potential damage to the printer.
-
-
-
Congratulations! You've sliced your model and prepared gcode for printing. Please see the specific printer tutorial to begin your print.
-


PrusaSlicer - Basic Printing: Quiz
Team
2 Comments
Hitting the Arrange button should take care of separating parts properly. Rafts are not covered in this tutorial and will most likely be covered in a separate, more advanced tutorial in the near future.
Matt P. Lamparter - Resolved on Release Reply