Introduction
This tutorial will guide you through setting up the MAX98357 using I2S, a digital sound protocol. Here's a link to a short video explaining the I2S breakout board
Parts
-
-
Before you complete this tutorial, make sure that you have completed the Feather M4 Express tutorial first.
-
Make sure that you're viewing this tutorial in Operator View! You must use Operator View to earn credit for this tutorial. Hit the button in the top right of your screen.
-
Make sure you have the Micro SD Card Breakout Board tutorial completed
-
-
-
Adafruit has provided a thorough explanation on how to set up the board. For more details, please visit this link. In this summary, I will highlight the important aspects.
-
Connect the pins: VIN to 3V on the Feather, GND to GND, DIN to D11 on the Feather, BCLK to TX, and lastly, LRC to D10 on the Feather.
-
For the SD card, Connect the 3V of the breakout board to the 3.3V of the feather, GND to the GND of the feather, CLK to SCK, DO/SO to MI, DI/SI to MO, and CS to any digital pin
-
To learn more about I2S visit this link
-
-
-
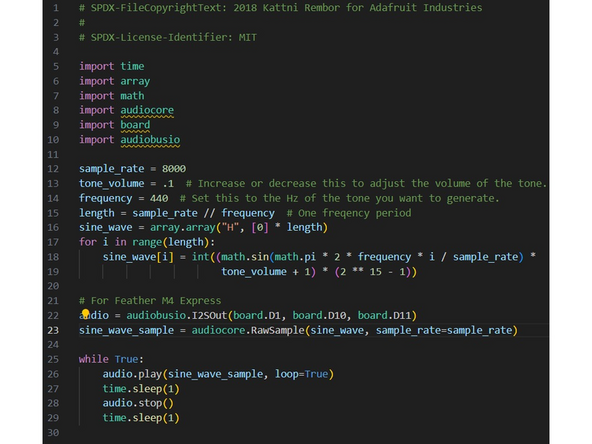
Upload this code from Adafruitunder Tone Generation
-
It will play a tone at a frequency of 440. You can change this to whatever frequency you'd like, as long as it is under 2200Hz. If you exceed that threshold, you might hear some distortion.
-
The code on Adafruit's website below Wave File plays any WAV file stored on your Feather M4. It's not ideal because the Feather can only store up to 2MB of data. In the next step, I will show you how to store it on the SD card and play it from there.
-
-
-
Run the example code that can be found on GitHub.
-
Download the WAV file and save it to the SD card using your kit's included SD card reader. Here's a link to download royalty-free WAV files.
-
Here is the download link for the one I used in the code
-
To use your own wav file, modify wave_file = open("add your file name", "rb") for it to function properly.
-
-
-
With what you learned, Upload a different WAV file and have it play on the speaker.
-
In your kit, you have a button and a resistor, create a Play/Pause control. The first press will play the music, and the second press will pause it.
-
It should look something like this in the video
-