-
-
This tutorial provides directions of vacuuming liquid components for use in mold making and casting.
-
Be aware of all safety hazards and clean the vacuum chamber after each use as needed.
-
Every use for using the vacuum is not covered here.
-
This tutorial was created by Jacob Nickle along with Gemini AI and Microsoft CoPilot.
-
-
-
Many materials require removing air from liquid silicone or other similar materials before using to create a mold or cast a new part.
-
The process of removing this air is called vacuum degassing.
-
Vacuum degassing helps the liquid material capture all detail within a mold and/or master object.
-
It also reduces the possibility of air bubbles ending up in the cured part.
-
While Academic East has a vacuum system, it is typically not strong enough for this purpose. This is why this tutorial explains how to use the vacuum pump and chamber setup.
-
-
-
Account for pot life before mixing components.
-
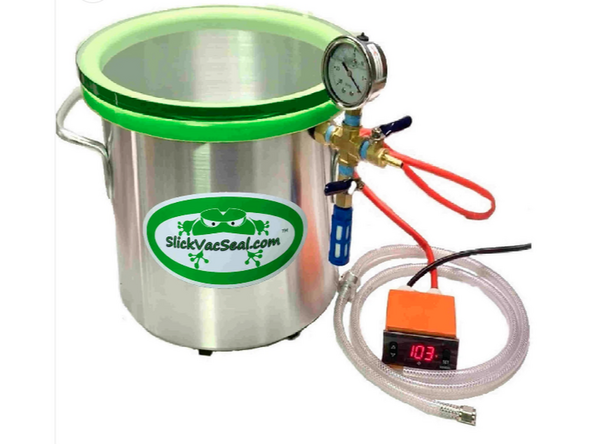
Check oil level. Oil level is on the side of the pump (red arrow). If it is low. Contact the lab director for additional instructions.
-
Vacuum degassing causes the liquid material to expand substantially. Container should have at least 2X volume of the liquid material to avoid spillage.
-
Plug in vacuum and if needed plug in heating pad.
-
Verify tube goes from vacuum pump to vacuum chamber as shown in image.
-
Close valve nearest air vent. Close position is perpendicular to the fitting (green arrow).
-
Open valve with tube going to vacuum pump. Open position is parallel to tubing (Pink arrow).
-
-
-
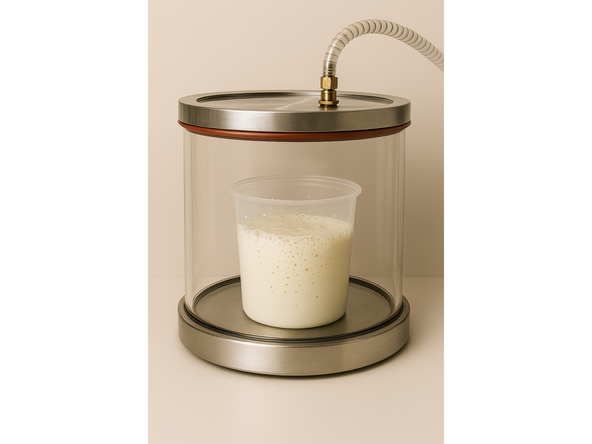
After mixing the components, place the mixture into vacuum chamber.
-
Place the lid securely onto the vacuum chamber to ensure a proper seal.
-
Switch on the vacuum pump (red arrow).
-
Watch the liquid material expand. Make sure spillage does not occur. Air can always be slowly let back into the chamber using the release valve (yellow arrow).
-
-
-
Ideally the vacuum pressure should reach 29 inHg as shown on the pressure gauge. (green arrow)
-
Do not let the pump run indefinitely. If it does not reach the threshold pressure within a minute or two, proceed to the next step regardless.
-
Once the pressure reaches or is near the desired threshold, do not turn off the vacuum pump yet.
-
First close the valve on the lid (pink arrow), then unthread the cap on the pump (red arrow). After that the pump can be turned off. This prevents oil from entering the vacuum line and causing damage to the pump.
-
-
-
Sufficient time under a vacuum can be identified by observing the materials behavior.
-
The material should expand and then collapse.
-
After it fully collapses, keep material under vacuum for between 90 sec - 2 min.
-
Afterwards the release valve can be gently opened (red arrow). This is done to avoid a sudden rush of air.
-
once completed, remove the material and use for mold making or casting. Then clean equipment, and return as needed.
-