
Introduction
This guide is a concise compendium of information for projects using the Thunder Laser. After completing this tutorial you will have learned how to use the Thunder Laser for simple project by making a key chain.
-
-
Any use of a laser cutter is potentially hazardous. Materials can catch on fire, disabling machine interlocks can potentially expose you to laser radiation capable of blinding you, and cutting the wrong materials can release toxic gasses.
-
Before you start cutting know where the fire extinguisher is in case materials ignite.
-
If you are unsure if a material is safe to cut, ask first. Many plastics contain chlorine or fluorine and materials like PVC, vinyl records, and Teflon are never safe to cut.
-
You must keep an eye on the laser cutter during any cuts in case there is a fire. Leaving the immediate area during a cut is a violation of the Maker-E User Agreement and may result in penalties up to permanent expulsion from the space.
-
-
-
The Thunder Laser will cut and etch the following materials at a thickness up to 6 mm:
-
plywood
-
acrylic
-
cardboard
-
leather (see note below)
-
Any material not on this list must first be approved by a Maker-E tech! Certain materials can cause fires or release toxic gases during cutting. Always check with a tech before using non-standard material!
-
Only natural, vegetable-tanned leather is approved for use with the laser cutter. Synthetic leather, or leather that has been chrome-tanned, may not be cut with the laser cutter due to safety hazards.
-
-
-
Your material must not exceed these dimensions: 25.5" x 20.5" x 6" (height).
-
Note that while a 6" thick piece of material can be used with the Thunder Laser for etching, it cannot be cut. The laser cutter cannot cut materials thicker than 0.25" or 6 mm.
-
The working area of the laser cutter is 23.6" x 15.7". This means that while your larger material may fit inside the laser cutter chamber, there is a reduced area where the laser cutter can still operate.
-
Pay attention to these parameters when designing your parts for use with the Thunder Laser.
-
-
-
The Thunder Laser uses LightBurn software.
-
The following formats are supported for cutting:
-
SVG, DXF, AI
-
Etching or engraving is supported for standard image file formats such as JPG, PNG, BMP, etc.
-
-
-
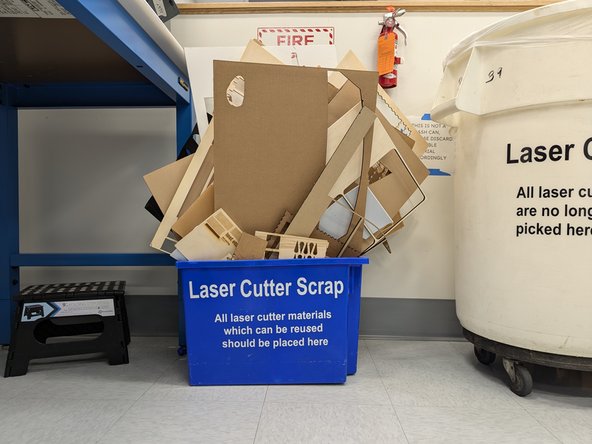
Check the bin near the Thunder laser first to see if your project will fit on used material. It is wasteful to always use fresh stock when working on a project. Whenever possible you should sort through the used stock in the blue bin underneath the plywood table.
-
For this project you will need a piece of material with an area about 3" x 3" square. We recommend using 4 mm cardboard for this project.
-
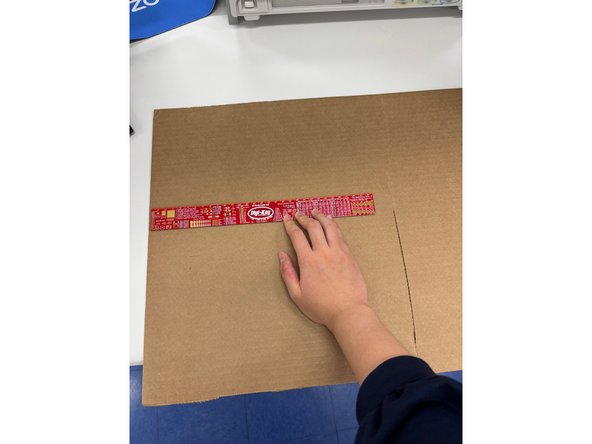
Grab a ruler and measure the remaining areas on scrap material to see if your project will fit on one or more pieces of scrap.
-
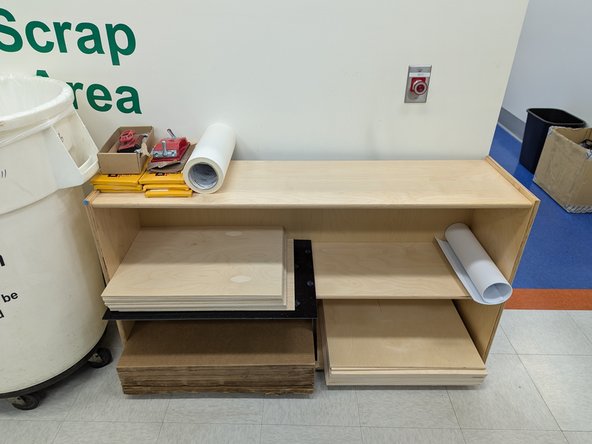
If your work is too large to fit on scrap then feel free to use new stock located on the shelves near the laser cutter.
-
If you are doing preliminary cuts or simply testing a design we recommend using cardboard rather than wood or acrylic. It is cheaper and faster.
-
Again, if you are not sure what is safe to cut, check with a MakerE Tech!
-
-
-
Every user should check the following before turning on the Thunder Laser:
-
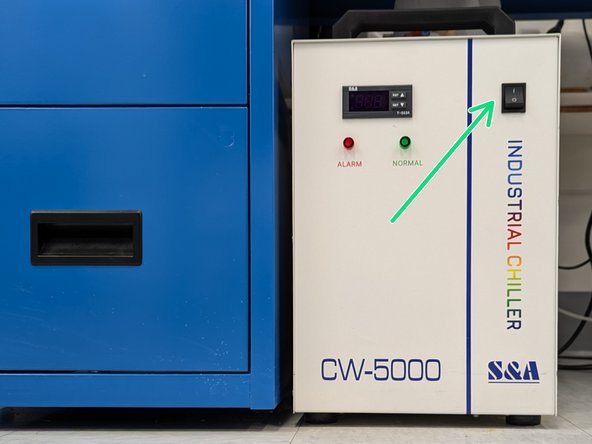
Make sure the switch on the chiller unit below the laser is turned to the on (I) position.
-
The cooler won't turn on until the laser turns on.
-
Only after you have checked the switch and made sure it is on are you ready to turn on the laser cutter.
-
-
-
Do not start the LightBurn software yet since it may throw an error if it cannot find the laser. You must turn the laser on before starting the software.
-
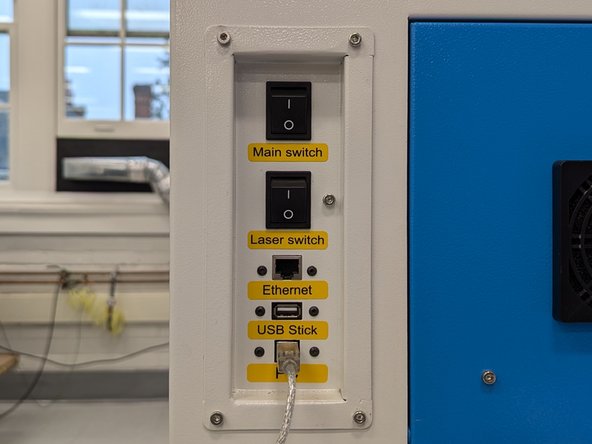
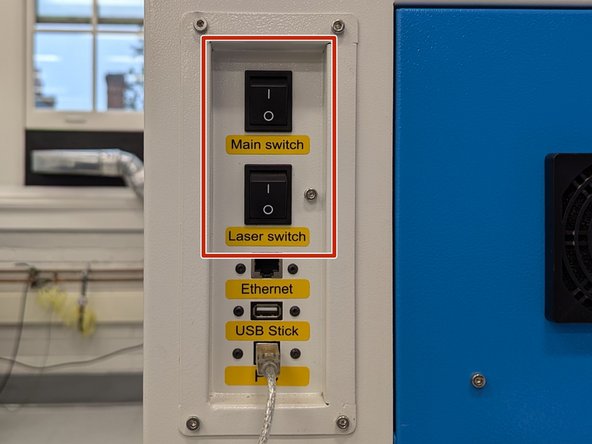
Insert your makerspace card into the Portal box to allow communications between the laser cutter and the computer.
-
Turn on the Thunder Laser using the Main switch and the Laser switch on the right side of the machine. You'll hear the chiller below the laser cutter beep. This is normal.
-
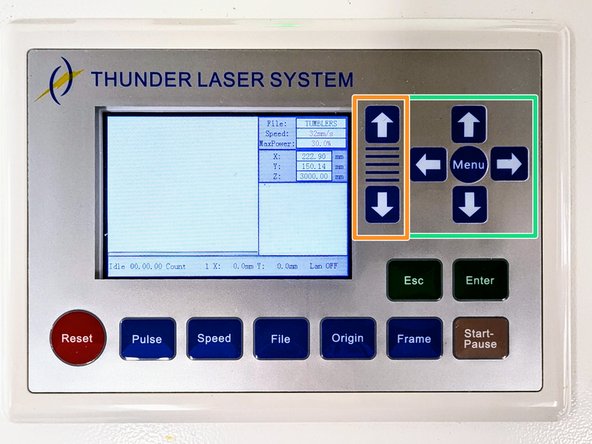
Once the machine is on you can move the laser head by using the four arrow buttons on the laser cutter interface, highlighted in green. Move the laser head to the back left corner of the bed.
-
You should also move the bed down so that there is enough clearance between the laser head and the bed to accommodate your material. Use the arrows highlighted in orange to move the bed up or down.
-
The interface may be difficult to see. Feel free to use the provided step stool to better access the interface.
-
-
-
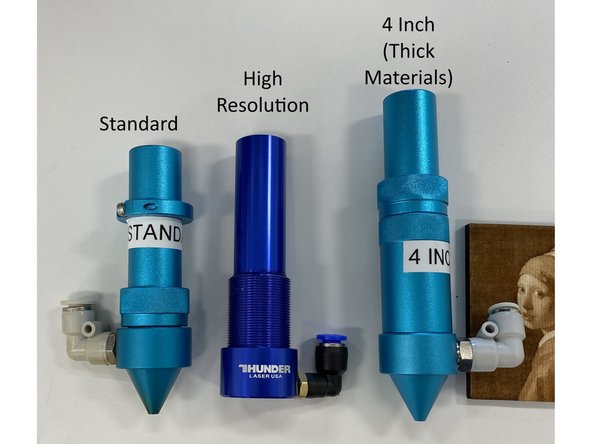
Note that different laser heads will affect cutting power and speed so verify which head is currently on the laser before cutting. The spot size and focal lengths vary.
-
The standard head is for most cutting and has a laser spot size of 0.0039 inches or 0.1 mm and focal distance of 6 mm.
-
The 4 inch head is to cut materials over 10 mm thick and has a laser spot size of 0.008 inches or 0.2 mm and a focal length of 9 to 11 mm.
-
The high resolution head is for engraving photos up to 1000 lines per inch. It will only cut materials 1 mm thick or less, has a 0.002 inch or 0.05 mm focal spot with a 3-4 mm focal length.
-
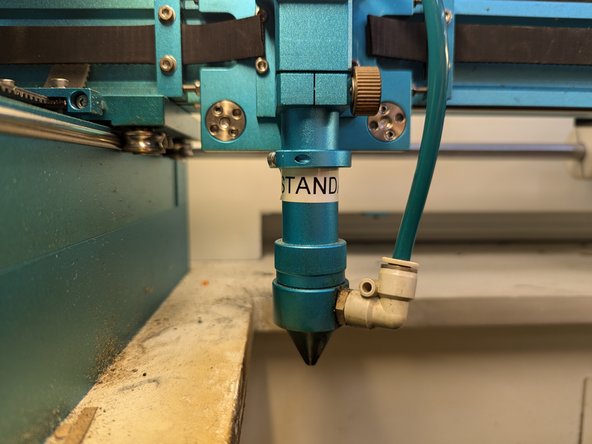
For this project you will need the standard head. Lift the lid of the laser cutter and confirm this head is attached. If another head is attached please stop and see a Maker-E tech for help.
-
-
-
Load your material into the laser cutter.
-
Be careful! Do not bump the laser head
-
Keep your material on the honeycomb portion of the bed, not the shiny metal edges of the bed. Note that the laser cutter cannot operate in the rear 1" of honeycomb so we have aligned our (used) material accordingly. It is also flush with the left edge of the honeycomb.
-
Check to make sure your material is completely flat- every part of the material should be touching the laser bed. Otherwise, the laser won't cut evenly.
-
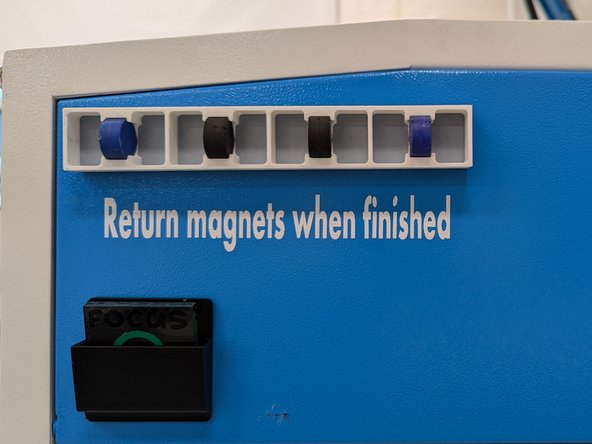
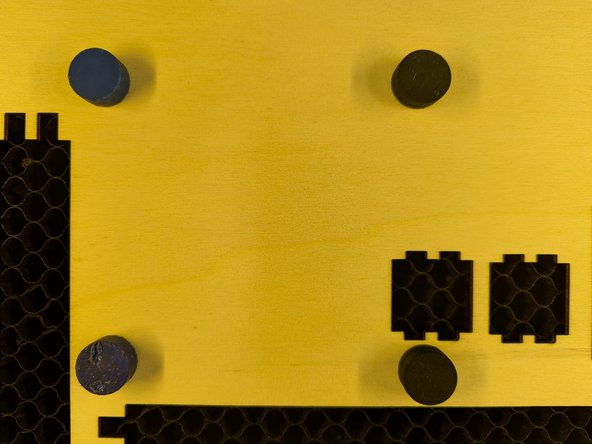
Use the disc magnets on the side of the laser cutter to hold the material flat. Place them around the area where you wish to cut your part.
-
The magnets are quite strong, so make sure not to stick them together!
-
-
-
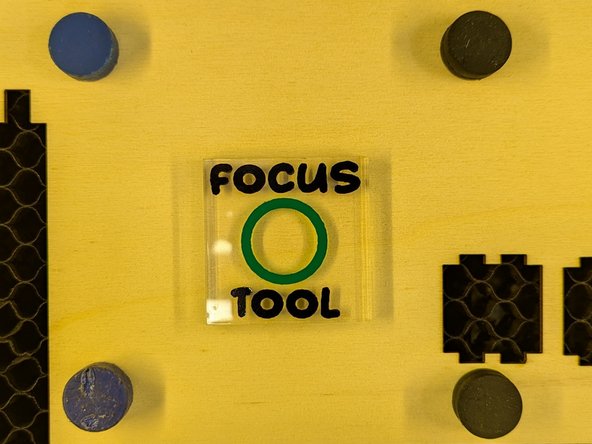
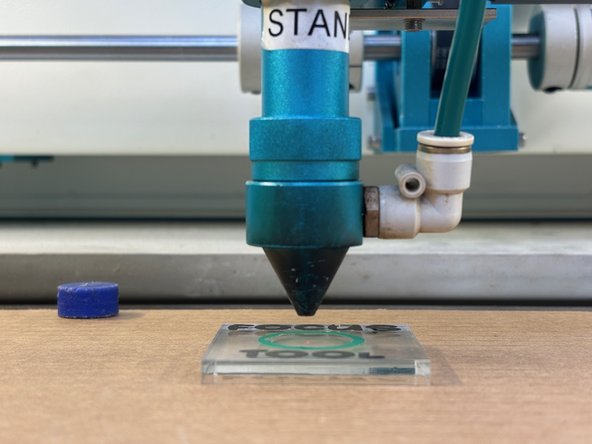
Grab the acrylic focus tool from the side of the laser cutter. Place it in the center of the area where you want to cut your project.
-
Use the arrow keys on the laser cutter interface (shown in green in a previous step) to move the laser head over the center of the focus tool. You should see the red laser pointer dot hitting your material.
-
Use the up and down arrow keys on the laser cutter interface (shown in orange in a previous step) to move the bed. You want to move the bed so that the laser head is within a millimeter or two of the focus tool.
-
Once the laser head is close to the focus tool you should loosen the brass thumb screw on the right side of the laser head. Allow the laser head to move down and rest on the surface of the focus tool. Now tighten the brass thumb screw.
-
The standard laser head is now properly focused 6 mm above your material.
-
Remove the focus tool and return it to the holder on the side of the laser cutter.
-
-
-
Log in to the laptop next to the laser cutter using the credentials on the laptop.
-
Launch the LightBurn software.
-
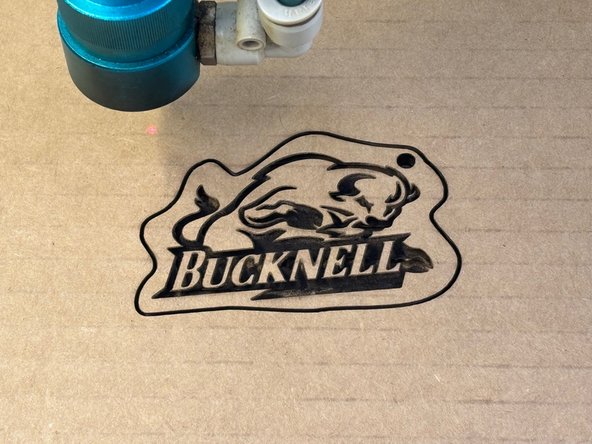
For this tutorial we will create a Bison keychain fob. Download the bisonKeychain.svg file. Note where you save the file.
-
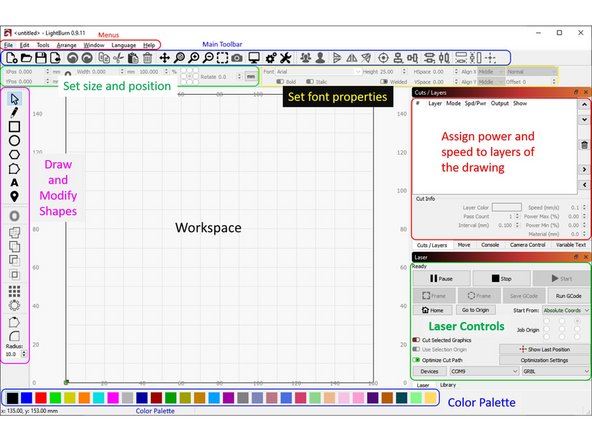
When the software loads it should look similar to the example shown here.
-
If you are missing any of these menus or windows choose Window -> Reset to Default Layout from the top toolbar.
-
-
-
The Lightburn software interface is somewhat intimidating, since it supports a lot of features. The next few steps will walk you through the basic steps of cutting and engraving. For a more in-depth exploration see this tutorial.
-
The image here shows the various parts of the Lightburn software work area. Different sections are highlighted to emphasize their use. We will focus on each section throughout this guide.
-
While it is possible to do basic design work in LightBurn such as adding simple text and shapes, anything more advanced should be completed using software on a different computer so that the laser cutter computer remains available for users wanting to use the laser cutter.
-
The Maker-E recommends using Inkscape which is free, open source software, for design work. Inkscape is available on all Maker-E computers or you can install it on your personal computer.
-
-
-
Use the File -> Import menu to load the bisonKeychain.svg file.
-
Confirm the following:
-
Output, air, and show sliders are all enabled (green) for all of the layers.
-
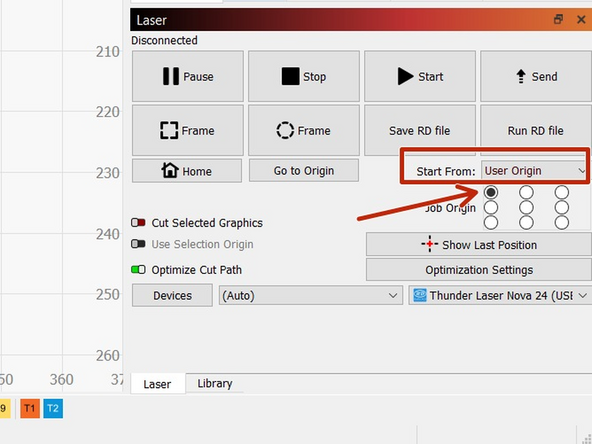
The Start from drop down menu is set to User origin and the Origin radio button is set to the top left corner.
-
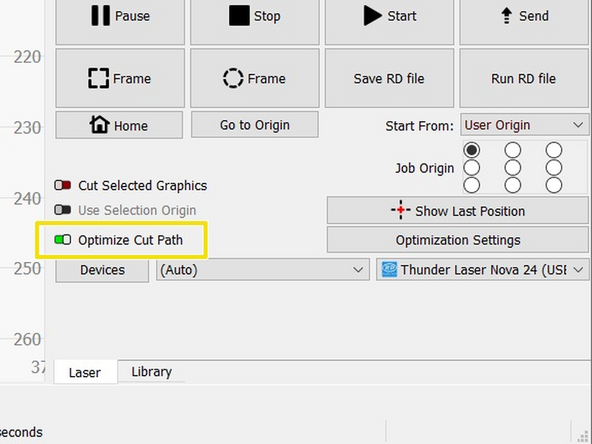
The Optimize Cut Path slider at the bottom of the screen is enabled (green).
-
-
-
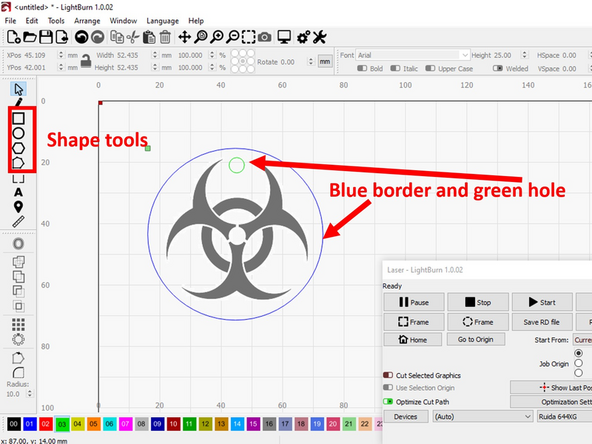
If you would like to use your own image for the keychain then import the image into Lightburn. It should be high contrast black and white or greyscale, and sized to fit on the keychain you would like to make.
-
After the image is loaded, use the box or circle tool in LightBurn to make a border around the image. This will be the outer diameter, which is cut by the laser.
-
Make sure to leave room for a hole for the keychain to go through.
-
Add a hole about 0.2 inches in diameter inside the border.
-
Change the color of the border by using the select tool (arrow at the top of the left tool bar) to select part of your drawing then the color palette at the bottom to set the color.
-
If you cannot select just the outline, then you will have to go back and fix your file before you can cut. See a tech for help.
-
Do the same for the hole, using a third color that is different than the image or the border, in this case green.
-
-
-
Performing a successful cut or engrave relies on setting the right cutting power and laser head speed.
-
The linked Google Sheet has recommended power, speed, and kerf settings for supported materials for this particular laser cutter (Nova 24). You should open this now to locate the correct settings for your material. Thunder Laser material settings.
-
There are settings for engraving images and separate settings for cutting materials. Make sure you choose the right ones!
-
Materials are not ideal so these settings are good starting points but won't always work. Plywood or MDF particularly have a lot of variation between pieces. We recommend doing a small test cut or engrave and dialing in settings before starting a big project!
-
Not all materials can be processed on a laser cutter and some materials such as PVC plastic or chrome-tanned leather can release toxic and/or corrosive chemicals. DO NOT cut any materials you are unsure of. Check with a Maker-E tech first!
-
-
-
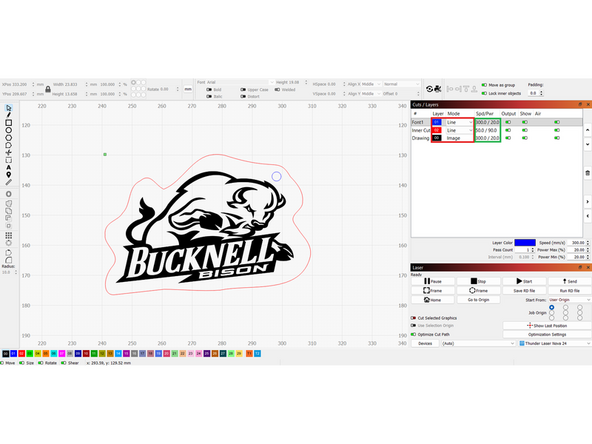
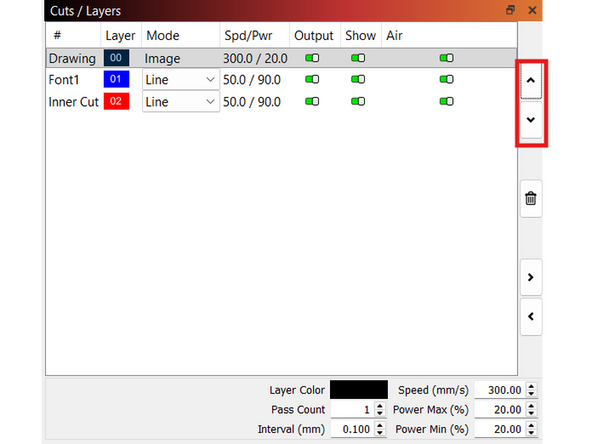
Once you have your file in Lightburn the software will break it apart into various layers that need different cut speeds and powers depending on their purpose. The colors are arbitrary. It is up to you to determine what each layer (color) will be used for.
-
Find the Cuts/Layers window shown in the figure. You will have one line for each of the layers (colors) in your figure. In the bison keychain example there are three layers: blue, red, and black.
-
Begin by specifying which mode each layer should be assigned. Line is used for cutting, Fill is used for engraving solid shapes, and Image is for etching images and graphics. Note that only certain modes are available for certain file types.
-
In our example the red outline and blue circle should both be set to Line since we wish to cut those shapes. The bison graphic is automatically assigned to the Image mode.
-
To set the power and speed for each layer, double click the layer and set the correct power and speed from the linked Google Sheet.
-
Don't worry about Min Power. The power values listed in the Google Sheet should be used for Max Power.
-
-
-
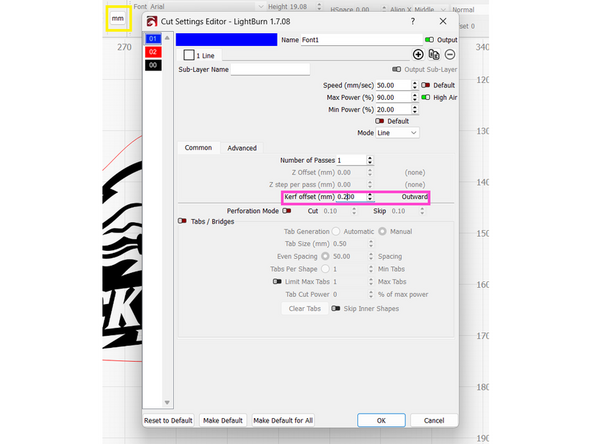
For a detailed description of what kerf loss is, please check out this resource. In a nutshell: the laser beam is not infinitely small. The beam will remove material, albeit a small amount. The width of the beam is called kerf. If you need precision parts to fit together properly you need to compensate for kerf loss.
-
While the keychain will not be affected by kerf loss we will still compensate for it to give you experience setting this parameter.
-
Double click a layer that is set to Line or Fill (images are not affected by kerf). Locate the Kerf offset box and set it to the appropriate value for your material. From the Google Sheet our 4 mm cardboard has a kerf value of 0.200mm. Enter this value.
-
Note the word to the right of the kerf offset says Outward. This is because our kerf is positive. We are setting the kerf for the blue layer which is the outline of our keychain and the outside dimension should be preserved. Kerf values which are negative appear as Inward which means they are internal cuts & internal dimensions should be preserved.
-
If the dimensions shown to you are in inches (not mm) you can toggle the units used in LightBurn by clicking the units button highlighted in yellow.
-
Double click the red layer and set the kerf offset to -0.200 mm. Note that the offset is now listed as Inward.
-
-
-
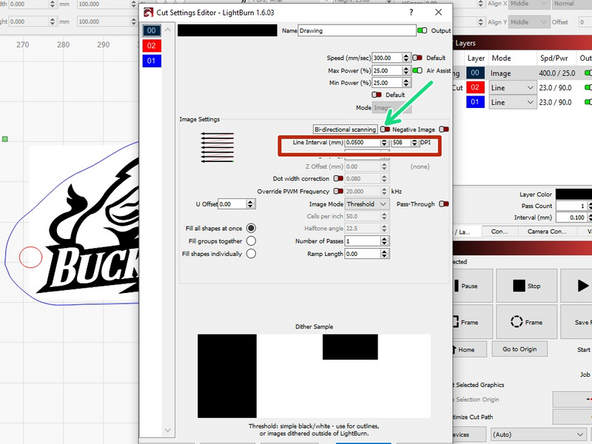
Double click the black image layer to bring up the settings for this layer. You should already have the speed and power configured from a previous step.
-
Images require an additional setting called Line Interval. This refers to how closely spaced the laser etched lines appear on your material. Smaller intervals result in denser lines and finer features which appears as a higher resolution image. However, smaller line intervals also require longer etch times. A good starting point is 0.05 mm.
-
Our bison example will look good with a 0.05 mm line interval. If you are looking to etch a photograph please see the separate tutorial on how to prepare a photo for optimal etching and which settings to use.
-
Bi-directional scanning allows the laser to fire when it is traveling in both directions. This works fine for basic etching like the keychain image so feel free to enable this option. It is recommended you run a small test job if you plan on using this setting for higher resolution images.
-
Bi-directional scanning will cut etch time in half. However, it has the potential to cause a decrease in image quality. Always run a test first for critical applications.
-
Because the laser cutter moves quickly there can be some offset between adjacent lines when it is rapidly etching back and forth. We have compensated for this offset to ensure a clean etch but this compensation is speed dependent. Be sure you are etching at 300 mm/sec! Etching images at other speeds will result in blurry or distorted edges.
-
-
-
Each cut/engrave is represented by a different color and layer. Before beginning your cut you will have to make sure the order of cuts and engraves is correct.
-
The order in which each layer is cut is important. The layer (color) at the top will be cut first, then the second, and so on until the bottom layer is last.
-
The correct order for cuts is described as follows:
-
Engravings should be done first, so those layers should be at the top of the list.
-
Next should be any interior cuts (holes, windows, etc.)
-
The last layer should be the outline
-
To change the layers, select the layer to move and use the up/down arrows (highlighted in red) on the screen to set the order. Your layer order should match the example shown here.
-
Again, confirm that Optimize Cut Path is enabled at the bottom of the screen. If this option is not enabled then the layer ordering will be ignored.
-
-
-
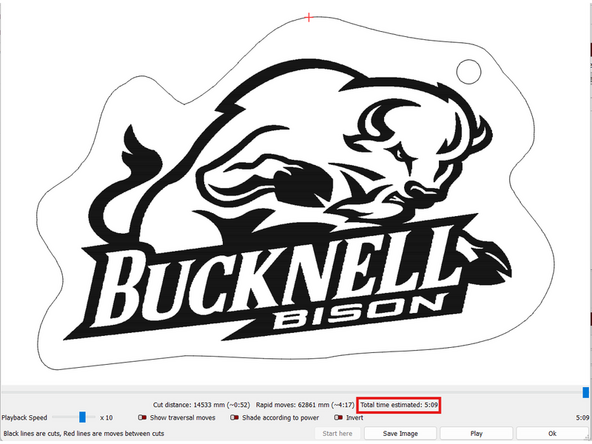
When you are finished with settings select Window -> Preview from the top toolbar. This will display a preview of the laser cutter job. Pay attention to the following:
-
Fills and lines look correct. There is nothing shaded that should not be a thin line for cutting.
-
Drag the slider at the bottom from left to right. Confirm that the cut order is what you were expecting with graphics first, followed by internal cuts, and finishing with exterior cuts.
-
Note the Total esimated time at the bottom right. This is how long you will need to remain by the laser cutter while it is operating so plan accordingly!
-
When you are satisfied that everything is correct you can close this window.
-
-
-
This is a very important step which if not followed can ruin your project or waste material!
-
In LightBurn, again confirm that the Start From drop down menu is set to User Origin. The Job Origin should be set to the top left.
-
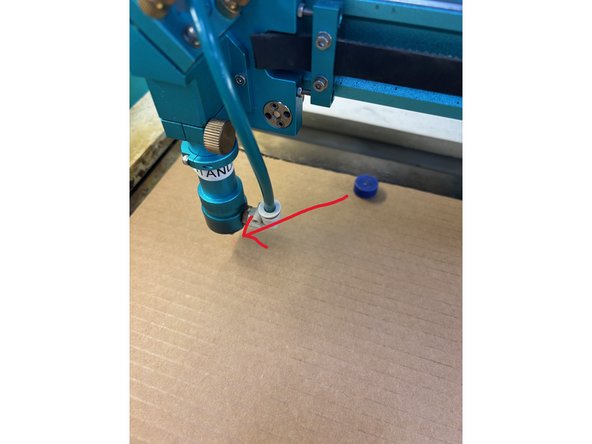
Use the arrow keys on the laser cutter interface to move the head to the top left corner of wherever you want the origin to be. The red laser pointer dot will indicate the position on your material.
-
Try to position the origin so that you use as little material as possible!
-
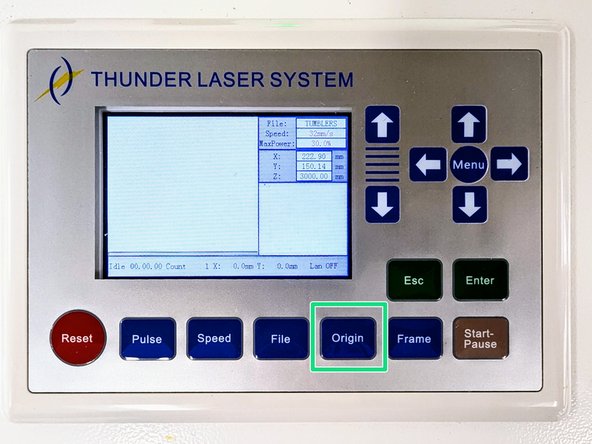
Press the Origin button on the laser cutter interface to set the origin of the machine to where the red laser pointer dot is currently located.
-
-
-
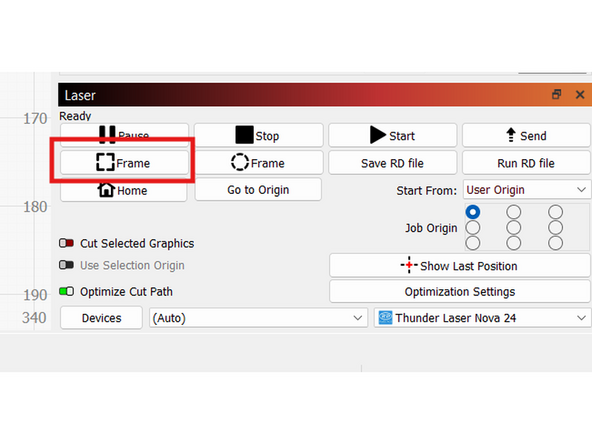
Once the origin is set, press the Frame button (square) in LightBurn.
-
After you press the button, the laser head will trace the outer bounds of your cut as if an imaginary rectangle were placed around the working area.
-
If the bounds exceed the size of the material, or the laser travels into an area where there are already cuts or etches, try to find a bigger piece of material!
-
If your part is larger than the bed size, you'll need to use the laser cutters in the Mooney lab or 7th Street makerspace which have larger capacities.
-
-
-
Watch this video of how the laser head moves after we press the Frame button.
-
Notice that the laser head moves in the area between the magnets. If the head were to bump a magnet this would be bad! Make sure that the magnets are spaced wide enough to allow the head to move unimpeded during operation.
-
Also notice that the laser head did not travel over any areas of the material that were previously cut or etched.
-
-
-
The laser can ignite materials and cause a fire. DO NOT LEAVE THE AREA WHILE THE LASER IS FIRING!
-
Double check the origin and frame area!
-
When you are sure everything is ready, close the laser cutter door.
-
Hold Shift on the keyboard and simultaneously press the Send button in LightBurn.
-
A window will pop up asking you to name the laser cutter job. The name is irrelevant and you can choose the suggested default. Once you press OK the laser should immediately start operating.
-
Some materials will flare up with small flames or char. Usually the air assist blows these out and you can ignore them.
-
If there are larger flames or the fire starts to spread, hit the emergency stop button and put out the fire with the nearby fire extinguisher!
-
-
-
Remeber: you must remain near the laser cutter the entire time it is operating. If your job is going to take an hour (not uncommon for larger or very detailed image etching) then you will need to remain by the laser cutter for an hour.
-
You do not have to hover over the laser watching it the entire time. You may sit beside the laser cutter and work on other projects. However, you must remain in the Fabrication Area at all times. You should check in on the progress every few minutes to confirm there are no problems.
-
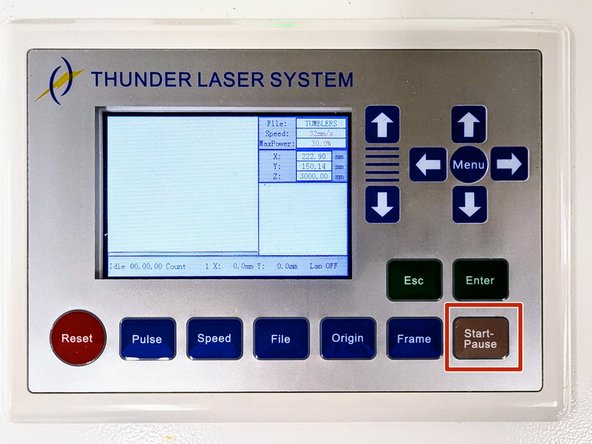
If you need to leave for only a few minutes you can temporarily pause the laser cutter by pressing the Start-Pause button on the laser cutter interface. This will immediately halt the laser wherever it is. When you return, press this button again and the laser will resume where it left off.
-
Leaving the Fabrication Area while the laser cutter is operating is not permitted, beyond a few minute absence while the laser is paused. Violation of this rule may result in revocation of laser cutter certification.
-
-
-
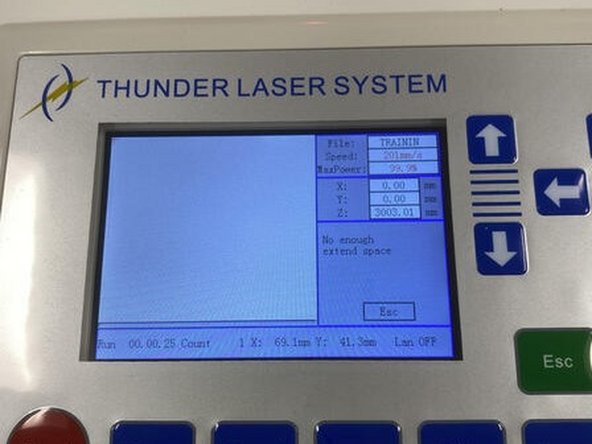
The "Not enough extend space" error might show up, and that's because there's not enough space for the cutter to accelerate/decelerate.
-
If you encounter this error try one or multiple of the following:
-
Move the work closer to the center of the laser cutter bed.
-
Enlarge the work.
-
Decrease the laser speed.
-
-
-
The laser should follow the operating order specified by your layers. In the example video here the etching is completed, then the interior hole is cut, and finally the keychain outline is cut.
-
After the cut is finished the laser head will move back to the set origin.
-
-
-
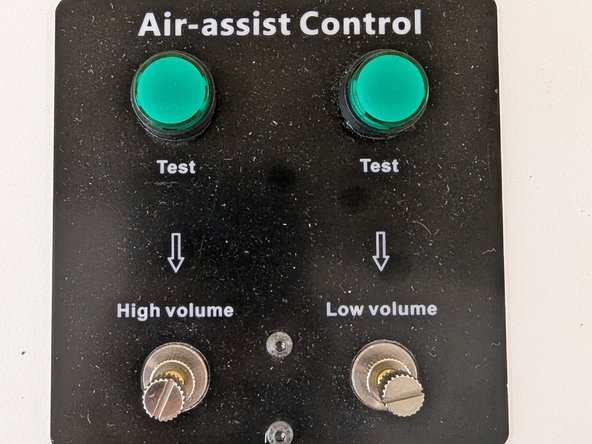
Wait for any smoke to clear and for the fan to shut off. The two Air-assist control lights on the left side of the laser cutter will go dim when it is safe to open the door.
-
You may now open the door and remove your piece. You should also remove the magnets and remaining stock material.
-
Be sure to remove any scrap bits of material that were left behind from small cuts. The bed should be clean and free of debris when you are done.
-
You can use the arrows on the laser cutter interface to move the head out of the way if that makes it easier to remove material.
-
-
-
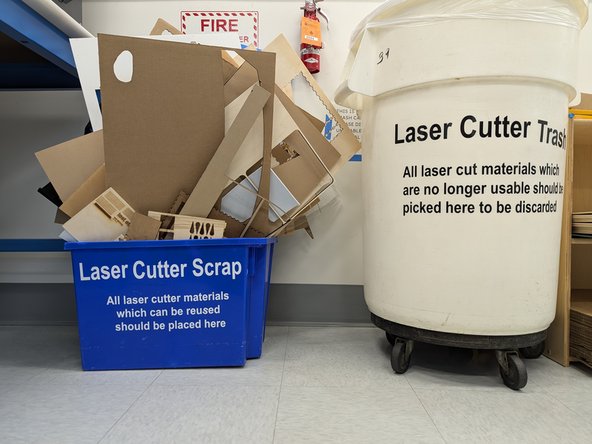
When your design and the remaining stock material has been removed, place the stock in the scrap bin. If you feel like there is no usable space left on the stock you may throw it away in the laser cutter trash can.
-
Clean the bed of the cutter for other people to use in the future. Make sure any pieces of material that are stuck in the grid get pushed out to avoid a fire hazard!
-
Close the lid of the cutter and turn off both power switches. Remove your maker card from the portal box.
-
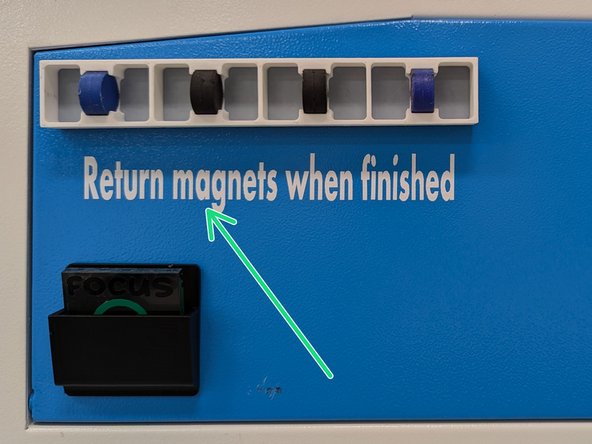
Be sure to return the magnets to their holder! DO NOT LEAVE MAGNETS IN THE LASER CUTTER OR ON THE METAL CASE OF THE CUTTER!
-
Space magnets out as shown in the example image so that they are easy for the next maker to access.
-


Thunder Laser Basics: Quiz
