Introduction
Instrument: Oriel Sol1A Solar Simulator, Keithley 2400 Source Meter
Software: Labview 2015, Excel
-
-
Turn on Keithley 2400 and connect the GPIB-USB connector to the laptop.
-
-
-
In Keithley 24xx Labview Files folder, open Keithley 24xx Sweep and Acquire Measurement. The user interface will appear as shown follow. Select the corresponding GPIB connection as the VISA resource name. The values in the left column should be unchanged.
-
-
-
For this application, select Voltage as the source mode. The compliance level is the maximum current limit. It should be set to be close to but a little larger than Isc of the solar cell to be measured. The smaller the compliance level is, the better accuracy the source meter will obtain.
-
-
-
For the detailed information about the minimum current detections by different compliance level settings, refer to the Source Meter Specification document. The minimum voltage is usually 0 and the maximum voltage should be a little above Voc of the solar cell.
-
-
-
The number of points should be at least 100. It could be more for smoother measurements, and the timeout needs to be set larger correspondingly (10000 for 100 points, 100000 for 1000 points, etc.).
-
-
-
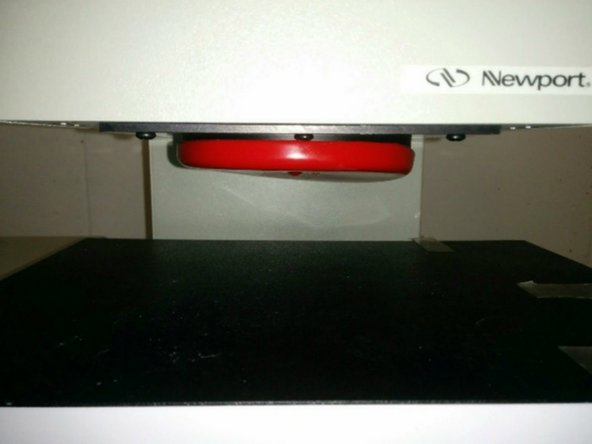
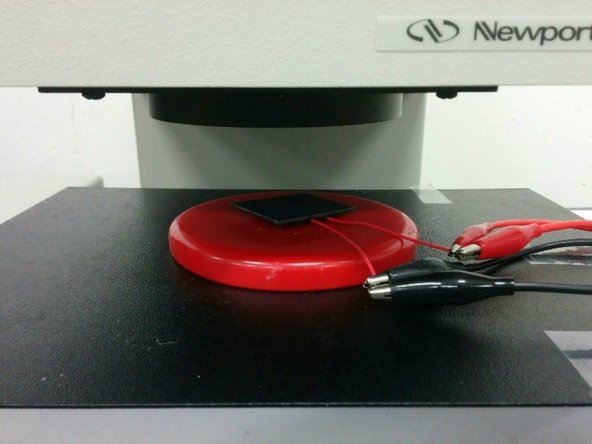
Remove the red rubber lid of the solar simulator. Connect the solar cell to the source meter (positive to positive, negative to negative) using 2-wire or 4-wire sensing. 4-wire sensing is recommended for better accuracy.
-
-
-
The working distance between the bottom end of the hole to the top of the solar cell should be around 2 inches. Currently the distance is adjusted by adding or removing paper from the bags under the metal box.
-
-
-
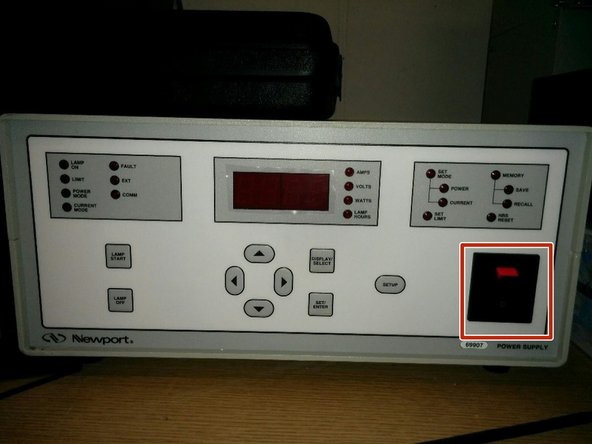
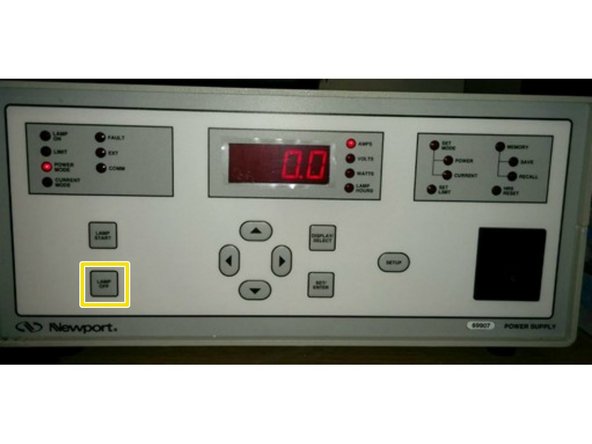
Turn on the solar simulator by moving the switch on the Arc Lamp Power Supply.
-
-
-
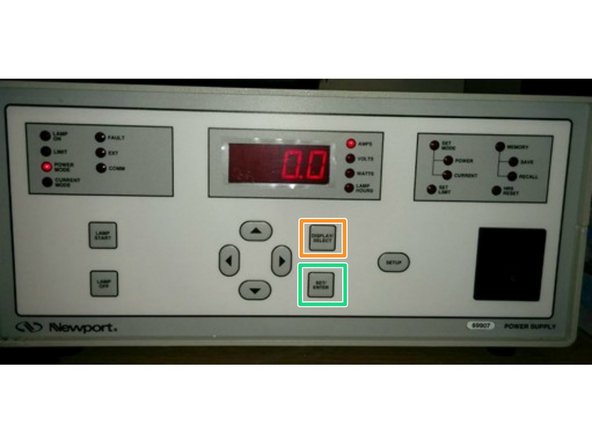
The setting usually does not to be changed. The power in Watts can be changed by pressing Display Select to Watts and long pressing Set/Enter, selecting digits with left/right buttons and moving the value up or down with up/down arrows, and pressing Set/Enter to confirm the change.
-
-
-
Before turning on the lamp, wear protective glasses and gloves. Wear lab coat if there is any uncovered skin.
-
-
-
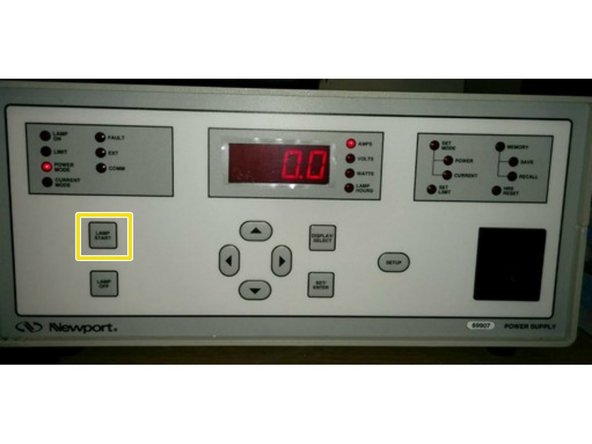
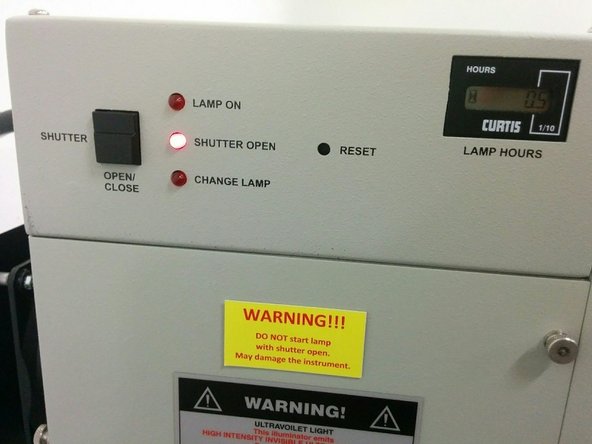
Turn off the room light to eliminate the disturbance as much as possible for the measurement. Before turning on the lamp, all three indicators on the top-left side of the lamp house should be off. Press Lamp Start button on the Arc Lamp Power Supply.
-
-
-
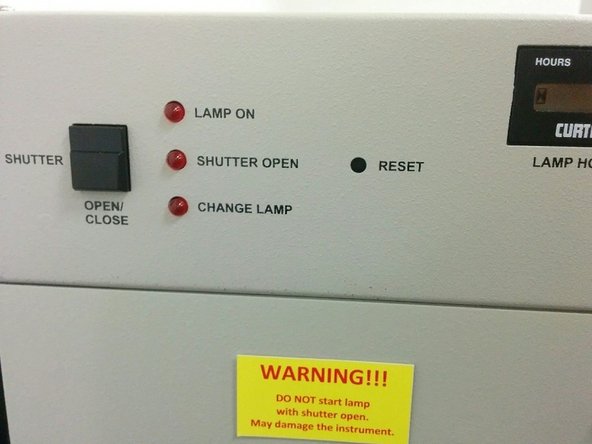
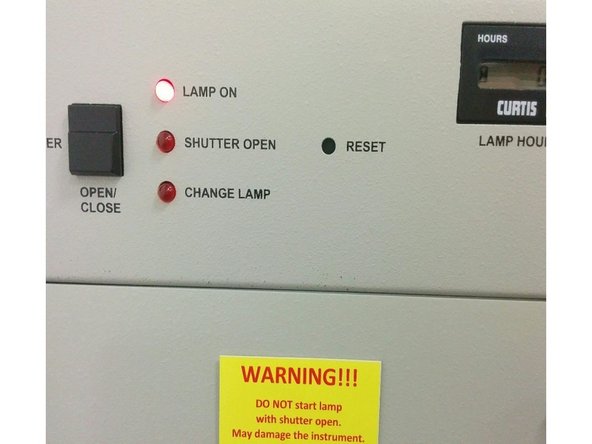
If you see the lamp on indicator on but shutter open indicator off (you do not see any light shining onto the solar cell but notice there is light coming out from the back of the lamp house and you don’t hear the sound of shutter open), you need to open the shutter by pressing the shutter open/close button on the top-left side of the lamp house.
-
-
-
You will see the shutter open indicator on and the light coming out through the hole. Note there is a possibility that the shutter could not be opened with the button especially if the solar simulator has not been turned on for a long time.
-
-
-
This could be solved by manually opening and releasing the shutter several times to restore the elasticity of the springs. You must check the manual for the lamp house to locate the shutter inside and do this extremely carefully not to touch anything else.
-
-
-
After confirming that the solar cell stays within the square shape of the light coming out through the hole, click on the run button in Labview. The IV measurements will run automatically after a “beep” sound.
-
-
-
When the test is done (there is no more numbers displayed on the screen of the source meter), turn the lamp off by pressing the Lamp Off button on the power supply. Check if the Shutter Open indicator is still on. If so, press the Open/Close button to close the shutter. Make sure the indicator is off. Turn on the room light.
-
-
-
Put the red rubber lid back onto the hole of the lamp house and turn off the power supply. Do not cut down the power to the power supply immediately. Make sure you give it enough time to cool itself down.
-
-
-
Export the measurement data to Excel by right clicking on the plot in Labview and then selecting Export and Export to Excel. Wait a few seconds and a new Excel file should be opened. The data points will be displayed in 4 columns. The IV curve can then be plotted in Excel from the voltage and current columns.
-