Introduction
This guide shows you how to transmit data from a ESP32 UWB, via a Notecard, and to Notehub. It also shows how to create a project in Notehub, such that the transmitted data can be viewed.
-
-
ESP32 UWB
-
Notecarrier-A
-
USB Type A to USB Micro B
-
4 male to female wires
-
-
-
Connect the following pins:
-
3V3 on ESP32 to V+ on Notecarrier
-
GND (the GND next to the 3V3 pin is the one we used) on ESP32 to GND on Notecarrier
-
IO21 on ESP32 to SDA on Notecarrier
-
IO22 on ESP32 to SCL on Notecarrier
-
Connect the ESP32 UWB to your computer using USB
-
-
-
Download Arduino IDE : https://www.arduino.cc/en/software
-
Once downloaded, choose the correct board:
-
Navigate to Tools->Board->Boards Manager
-
Search “esp32” and click “Install”
-
Once installed (can take a few minutes), navigate to Tools->Board->esp32 and select “ESP32 Wrover Module”
-
Select the port by navigating to Tools->Port and select the port you want to use. In my case it was called “/dev/cu.usbserial-02310491”
-
Install the Notecard library: https://dev.blues.io/tools-and-sdks/libr...
-
-
-
Each Notecard comes with 5000 “consumption credits.” To utilize these credits, you need to create a Notehub account. After setting up a Notehub account, you can create a project. Then, by adding the ProjectUID to your code, the data sent from the Notecard will appear in your Project.
-
Sign up to Notehub: https://notehub.io/sign-up
-
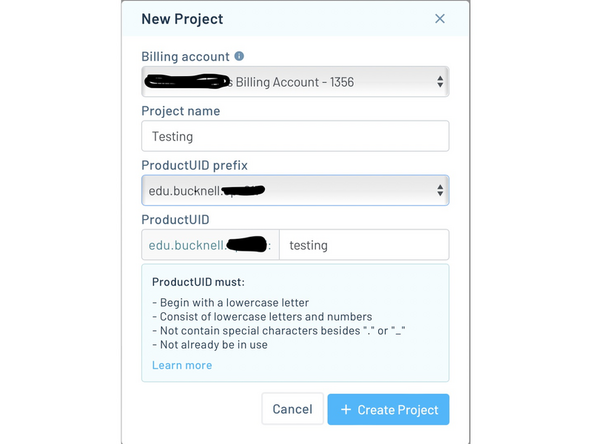
Create a project by clicking “Create Project”. Something similar to image 1 should pop up.
-
Add a project name and complete the ProductUID. Click "Create Project."
-
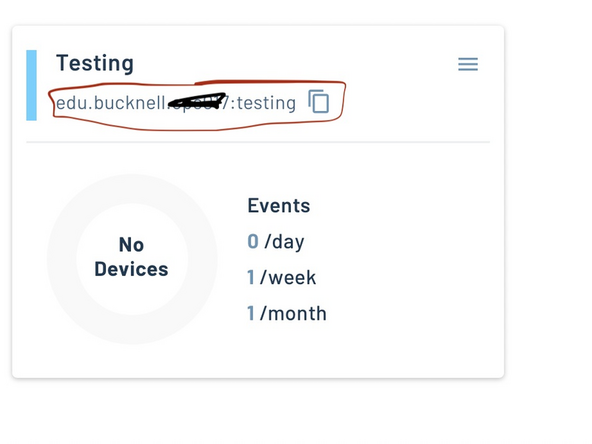
The ProductUID is circled in red in the second image. Copy this ProductUID.
-
-
-
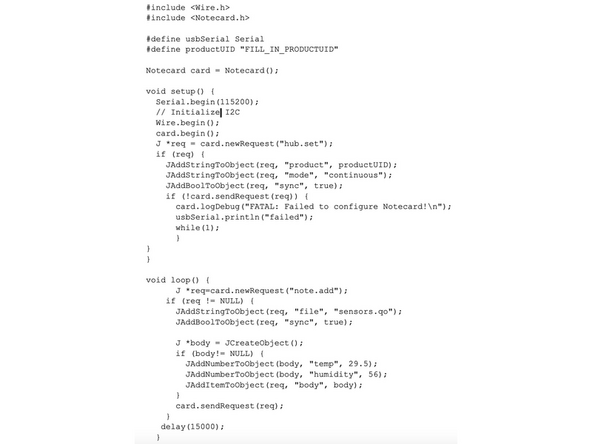
Copy the code from the image into Arduino IDE. The code is a basic “Hello World,” which sends a hardcoded temperature and humidity value.
-
Under #define productUID "FILL_IN_PRODUCTUID", add the ProductUID from Notehub. It should look something like #define productUID "edu.bucknell.XXX:testing"
-
Compile and upload the code to the ESP32 by clicking the "->" icon in Arduino IDE
-
-
-
In Notehub, click on the project you have created.
-
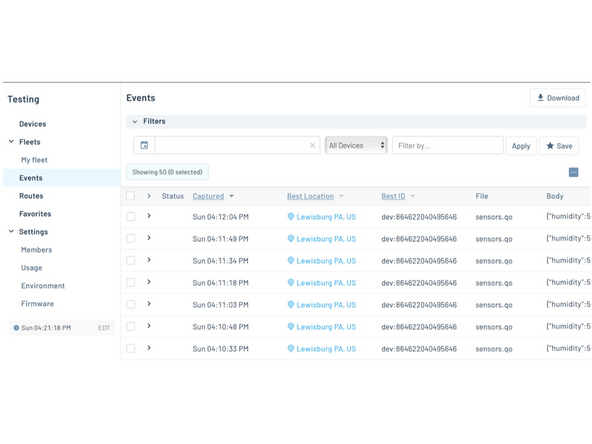
Select "Events"
-
Data should now have been sent to Notehub, and it should look something like the image.
-