
Introduction
Process for setting up online video recording with OBS, Wacom Tablet, and OneNote.
Hardware:
Blue Yeti microphone: https://www.bestbuy.com/site/blue-microp...
Webcam: On most Laptops, but you can purchase one with the microphone:
https://www.bestbuy.com/site/blue-microp...
Writing tablet: Wacom Intuos
https://www.bestbuy.com/site/wacom-intuo...
Software:
Onenote (free on Windows computers) or any other software that will let you draw with a pen
One note lets you wite on a white space (any background color) using pens or highlights etc. You can import files to write over directly. It allows you to configure notebooks with sections and pages so you can have a notebook for each course with sections related to book sections and add notes from there. (I found that Onenote 2016 seems to work better with the Wacom tablet than the newer version)
If you have ppt files that you would like to write over using Onenote,
Create or open a page in OneNote where you want to insert a PowerPoint presentation.
Click Insert > File Printout.
Right-click on each slide and set as a background image.
https://support.office.com/en-us/article...
An example of a person on Youtube using OneNote for a math course:
-
-
Install the Wacom Tablet drivers on your computer. When they mention that you need to restart your computer, in fact you do in this case.
-
-
-
The Blue Yeti microphone was plug and play however, you must make sure the microphone is set as the default recording device in control panel - sound
-
-
-
If you want to have your image or video of yourself inset in your recording then you will need a web camera. Most web cameras are plug and play.
-
-
-
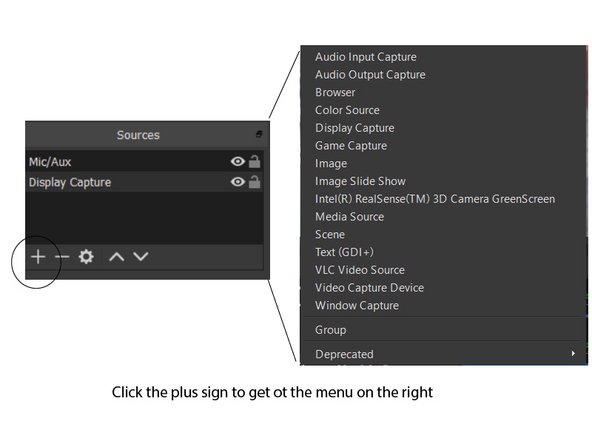
Configure the OBS software. First you need to configure your sources: Microphone, any screen that you want to share (if you have multiple monitors for instance and a web camera)
-
-
-
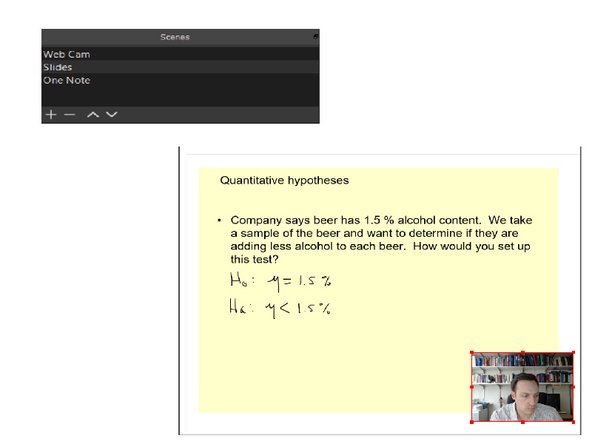
Add scenes: I have a scene for just my webcam, one for my Onenote screen and one for my slides
-

Cancel: I did not complete this guide.
One other person completed this guide.
Attached Documents

3 Comments
I used a XP-Pen Star G430S ( https://www.xp-pen.com/product/52.html ) drawing pad and it worked pretty good, you could try one of the cheapest pen tablet versions.
Thanks for taking the time to put this together. I’m planning to try OBS today and I have to admit that the notion of a “scene” is still confusing to me. The startup guides tell me that I can have several sources and several scenes, that their names are in the same namespace, that I can reorder the list, and so forth but never seem to describe the concept of a “scene” and how it is different from a “source”. My high school drama experience tells me that scenes are distinct, sequential parts of an overall production but I’m pretty sure that’s not how OBS uses them. Have you seen any introductory material that discusses these concepts for OBS or for video production in general? Thanks.
Hi Joe,
Yes, they use the term screen incorrectly. Really they just mean a set of sources to compose your shot. So it might be just your desktop or a web camera or both.
Brandon