
-
-
Open CorelDraw on your computer.
-
For first time users, check the box that says "Use an existing account" and press continue.
-
In the bottom text box (under "This product has already been registered.") type in software-licensing@bucknell.edu
-
Click "Continue".
-
-
-
Select "Get Started" on the left side of the pop up box.
-
If you are setting up your document for the first time, you will need input new settings under the Document Settings (do not pre-select a size from the left side).
-
Click New Document.
-
If you are a returning user, your previous 36"x24" document should be in the list of options to pre-select on the left side of the screen.
-
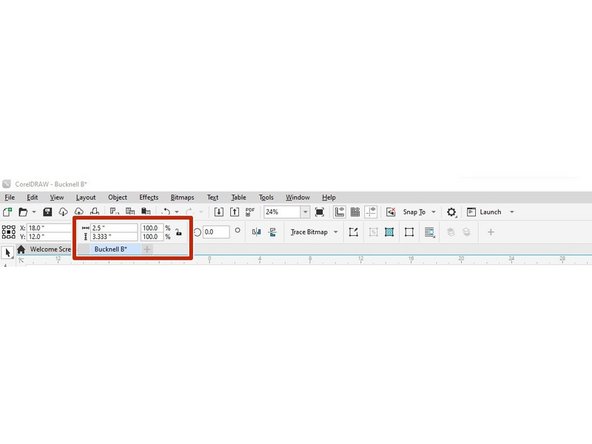
Title your document under "Name". Select RGB color mode. Set the document size to 36"W x 24"H. Orientation should be landscape. Resolution should be 300.
-
Click OK.
-
-
-
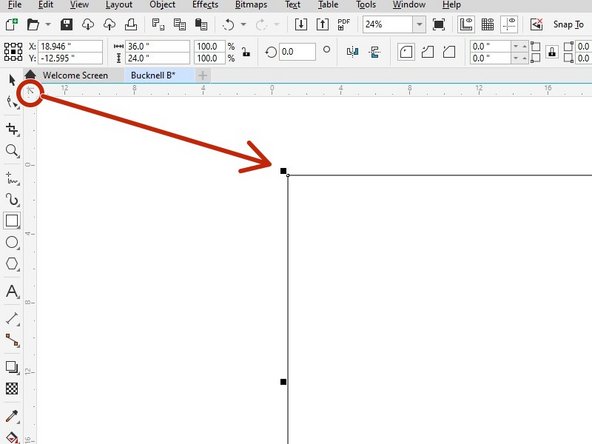
With your new file set up, we want to check the origin points are set correctly. If the top left corner is lined up with the 0,0 origin on the vertical and horizontal rulers, you are all set and can skip to step 6. If it is not, please proceed to the next step.
-
-
-
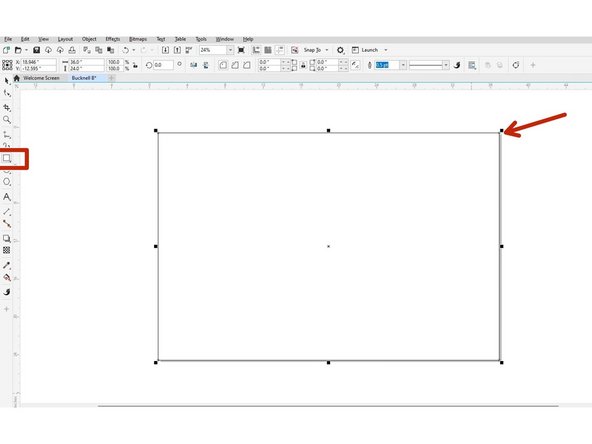
Double click on the rectangle icon in the left toolbar. The artboard should now have been selected.
-
Under the house icon on the toolbar there is a small cross bow icon (located to the right of the black arrow). Click and drag this icon to the top left corner of the rectangle.
-
The origin point of your top left corner of the rectangle should be 0,0 if you now look at the top and left ruler.
-
If this is correct, you can click the arrow on the top left toolbar.
-
Now click on the rectangle on the artboard and delete it.
-
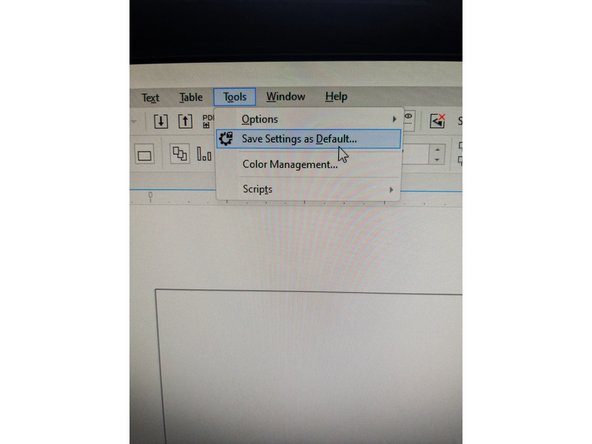
Now, go to "Tools" in the top toolbar and click "Save Settings as Default".
-
Click "Save".
-
-
-
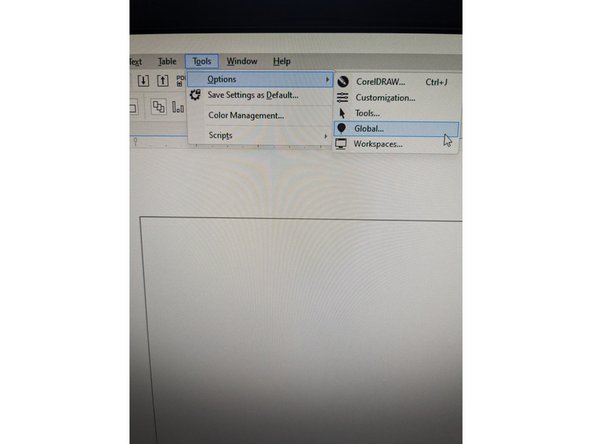
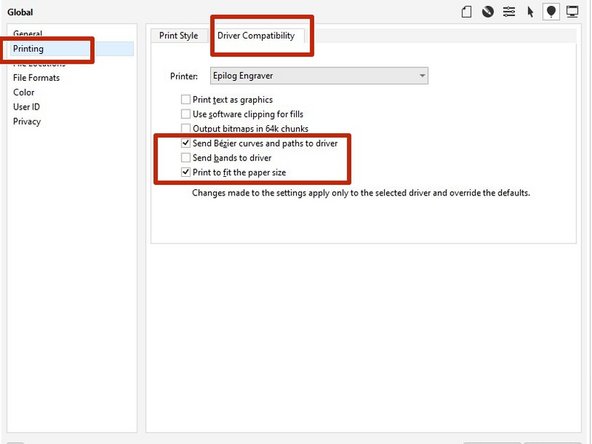
Now go back to "Tools" in the top toolbar and under "Options" select "Global".
-
Select "Printing" on the left side then select "Driver Compatibility".
-
Under "Printer", select "Epilog Engraver".
-
Make sure "Send Bezier Curves and Paths to Driver" and "Print to Fit the Paper Size" are both checked.
-
Click "Ok".
-
-
-
At this point, you may begin drawing your image using the text and shape icons on the left side of the toolbar.
-
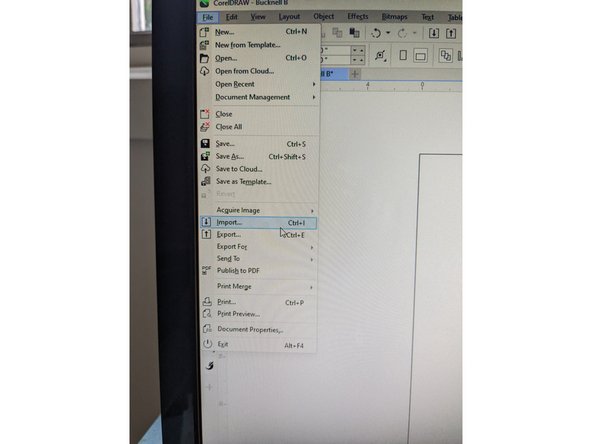
OR, you can import your image by going to "File" -> "Import".
-
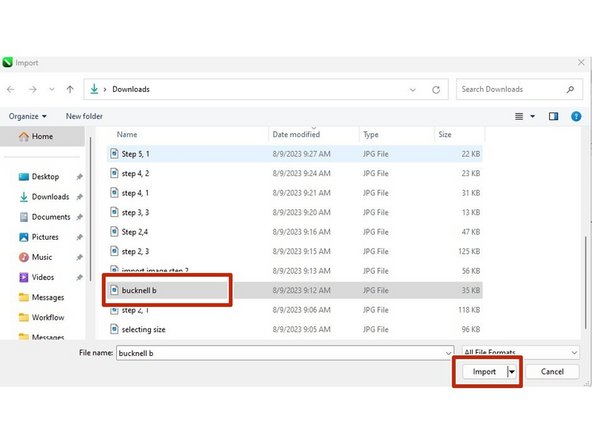
Locate your design. Once located, click "Import".
-
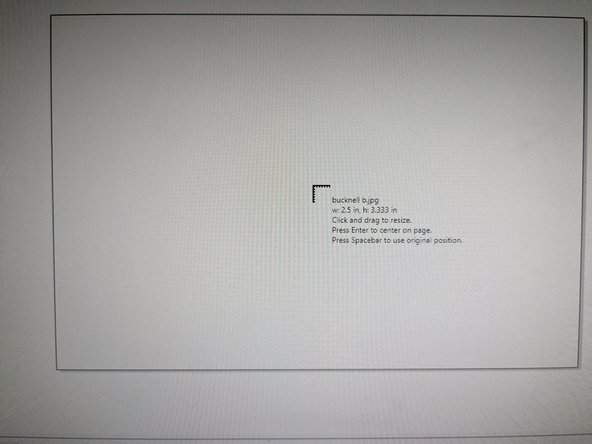
You can either click and drag to place your image onto the artboard or click "Enter" on the keyboard for it to import in its original size.
-
-
-
If you need to change the size of your image, click the open lock in the top right corner of the toolbar (to scale the image correctly) and enter the correct dimensions for width and height.
-
-
-
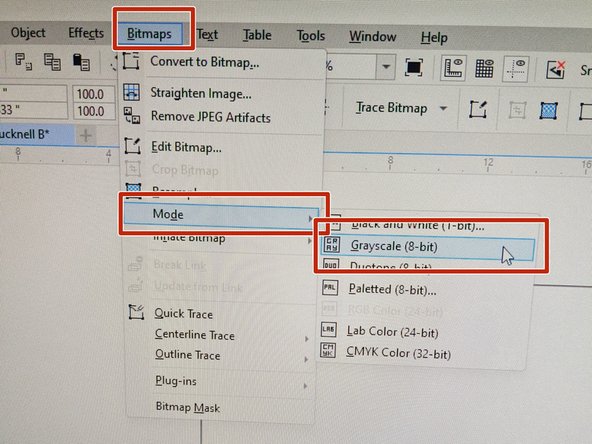
In the top toolbar, click "Bitmaps".
-
Then click "Modes" and select "Grayscale". Your image should turn into a grayscale version.
-
-
-
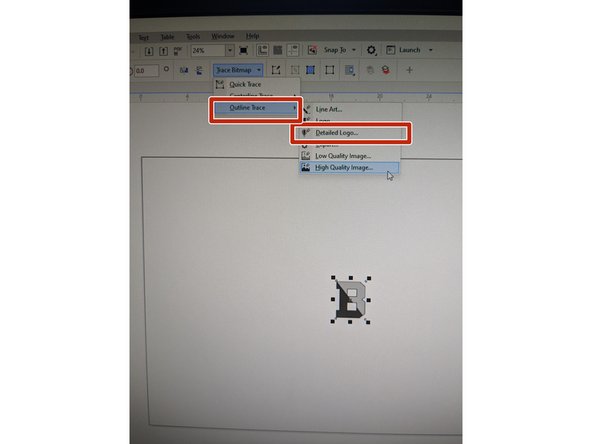
Click on your image and in the top toolbar, click "Trace Bitmap".
-
Select "Outline Trace" and then "Detailed Logo ".
-
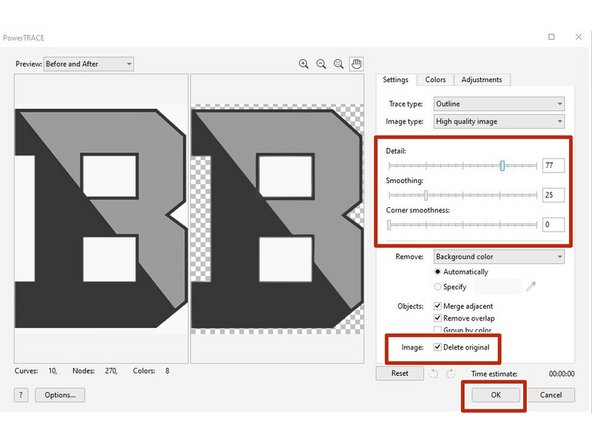
Change the settings to create an image best suited for you.
-
Check the box next to "Delete Original".
-
Click "Ok"
-
-
-
Once your file is set up to your satisfaction, you are now ready to print.
-
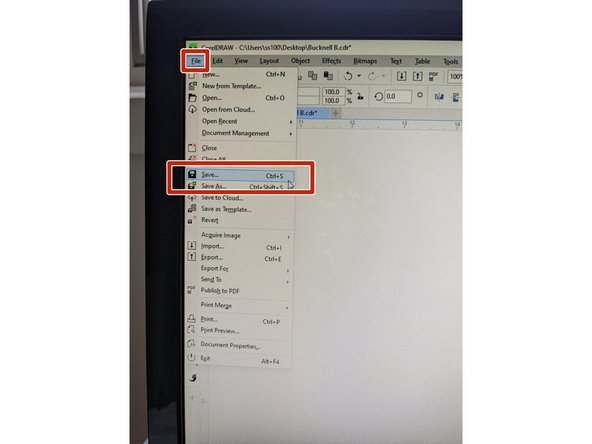
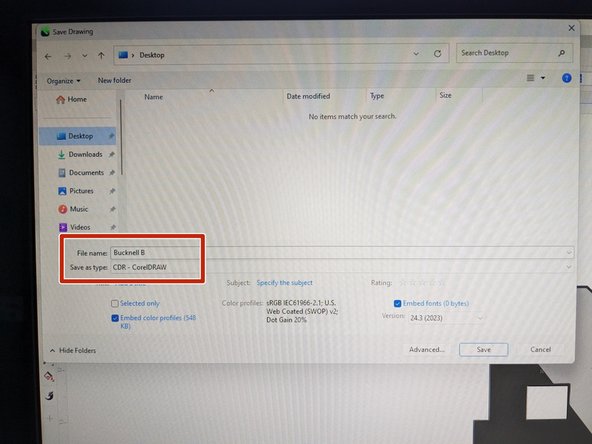
Please save your file by going to File -> Save.
-
Save this to your public netspace, on a USB or save it and email it to yourself.
-
This file should be saved as a CDR (CorelDraw) file.
-
Now, you are going to jump over to the computer located next to the laser cutter to prepare your file to print.
-
-
-
Before going to the laser cutter computer, you want to make sure you have your material. In the laser cutter room, we have a desk with shelving that has FREE materials for you to use.
-
If you cannot find the material you are looking for, a student employee can help you locate a larger piece of material. Please note that new sheets of acrylic and wood have a fee and can be purchased using BUID, cash or check. Wood is $5 per sheet, Acrylic is $7 per sheet.
-
Make sure the material you select can fit the size of your image.
-
-
-
Login into the computer located next to the laser cutter and open CorelDraw.
-
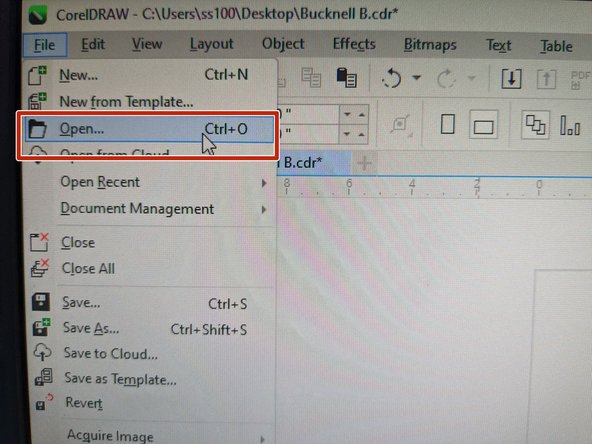
Open your file in CorelDraw on the computer located next to the laser cutter. Go to File -> Open.
-
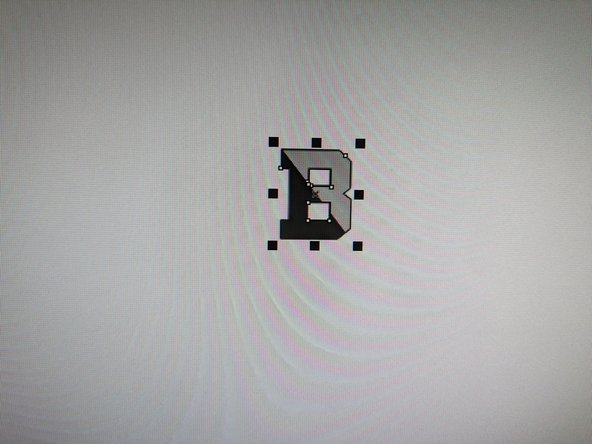
Click and drag from right to left to select your entire image.
-
-
-
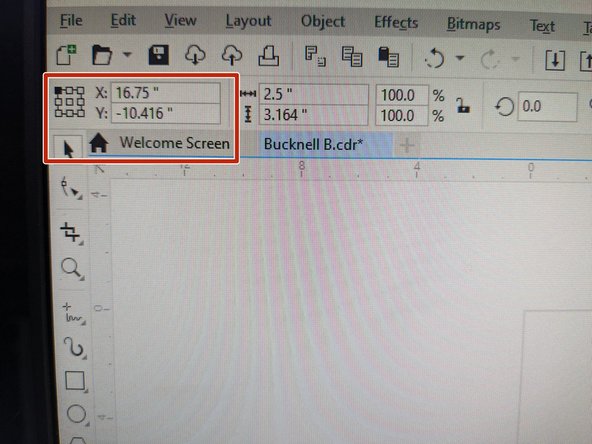
In the top left toolbar, you will want to select the top left box in the array of 9 boxes.
-
Then, change the X and Y axis numbers to 0.
-
Your image should now be in the top left corner of the screen.
-
We want to make sure our image is orientated in the top left corner of the screen, where the origin point is set.
-
-
-
Before the next step, we are going to turn on the three parts of the laser cutter.
-
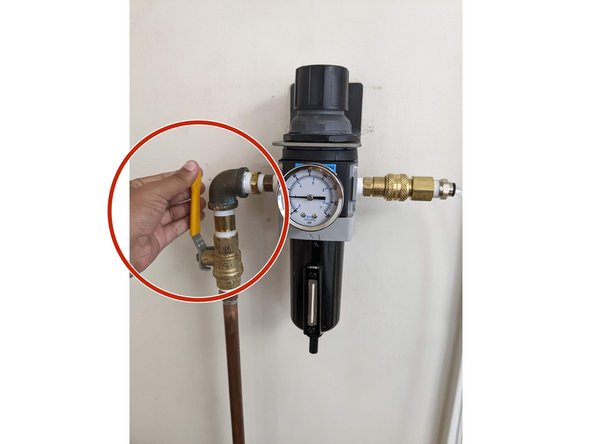
First, turn the yellow handlebar on the wall located to the left of the laser cutter from a horizontal to a vertical position. You will hear a hissing sound. This is allowing air to flow freely into the laser cutter to prevent fires.
-
-
-
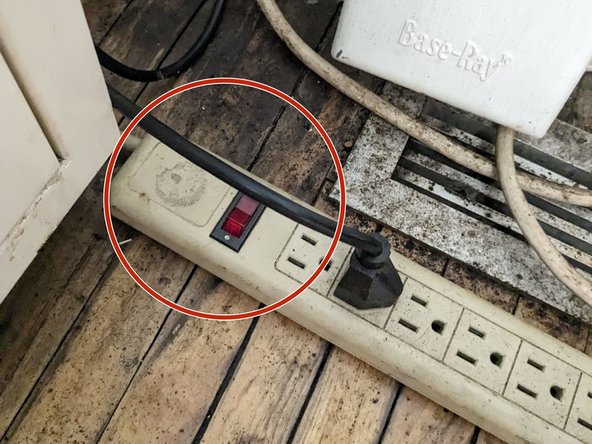
Next, turn on the red button located on the power strip on the floor where the exhaust system is located (to the right of the laser cutter).
-
This will make a louder noise as it runs.
-
-
-
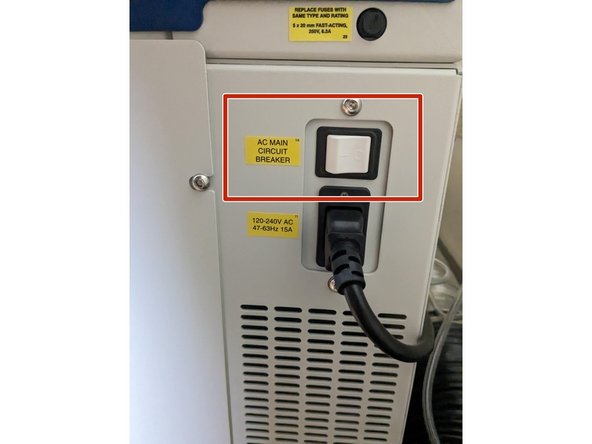
Finally, turn on the laser cutter by pressing the white power button located on the right side of the machine. The lights inside of the laser cutter will let up.
-
In the next 30 seconds the laser cutter screen will turn on.
-
As the laser cutter resets itself, it will make some noises. This is normal.
-
-
-
Back on the computer, we are now ready to send your file to the laser cutter.
-
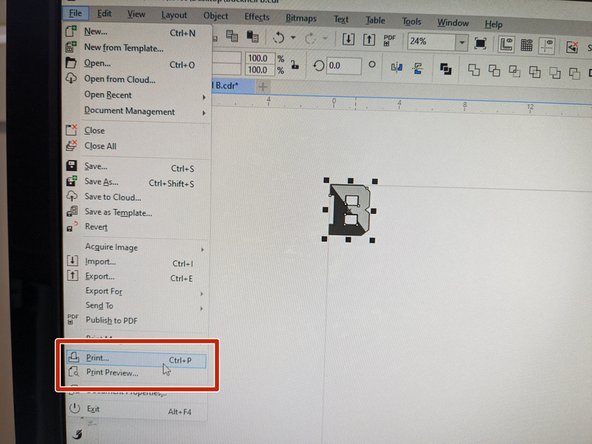
First, go to File -> Print (or Ctrl+P).
-
A new pop up window will appear.
-
-
-
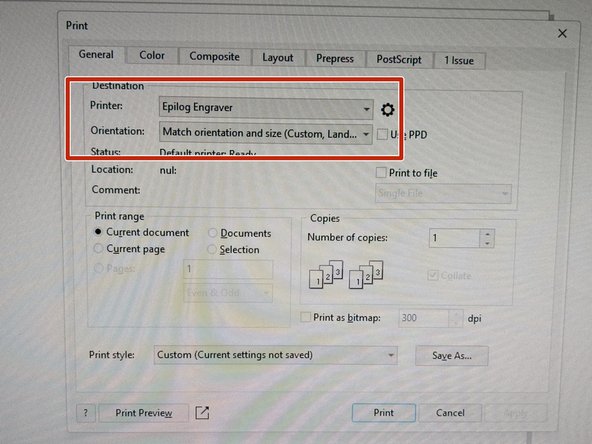
Back in CorelDraw, with the new printer box open, select "Epilog Engraver" as the Printer.
-
Keep the Orientation as "Match orientation and size (Custom, Land..."
-
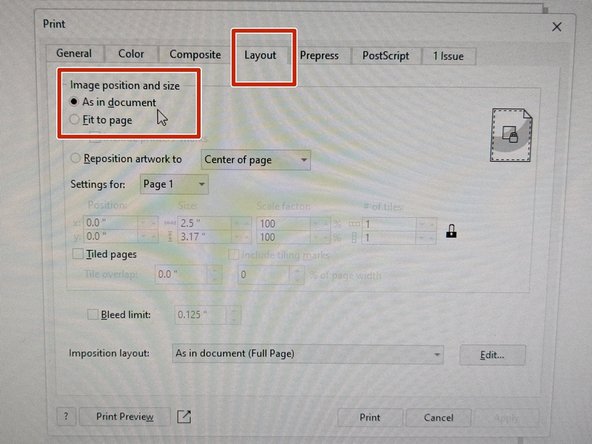
Next, you want to make sure the layout is set correctly.
-
You will want to click on the "Layout" tab in the top toolbar of the Print dialogue box.
-
Check the box that says "As in Document".
-
Click "Print".
-
-
-
The first time you are using the laser cutter, you will need to register the printer. This will only need to be done once. If completed already, skip to step 22.
-
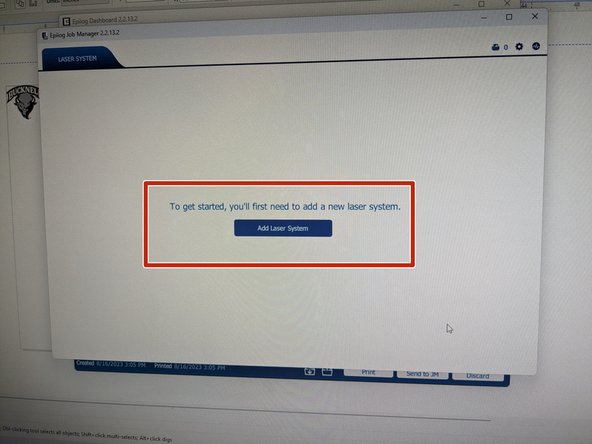
Click Open Job Manager.
-
Click the button that says "Add Laser System".
-
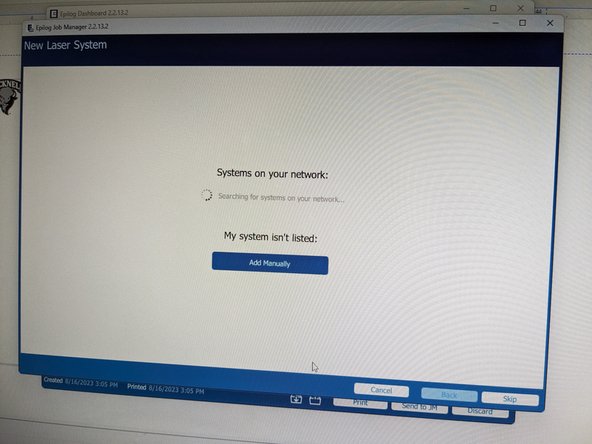
The computer will begin searching for the laser cutter. Do not click anything yet.
-
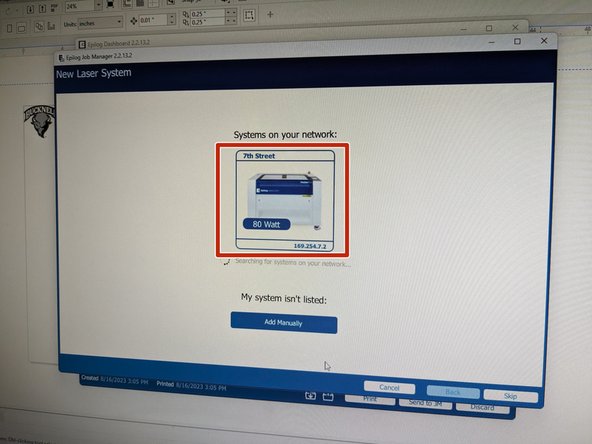
When an image of the laser cutter pops up, click on the image.
-
-
-
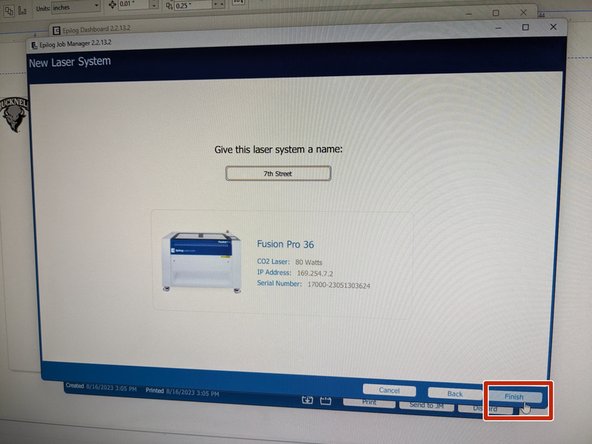
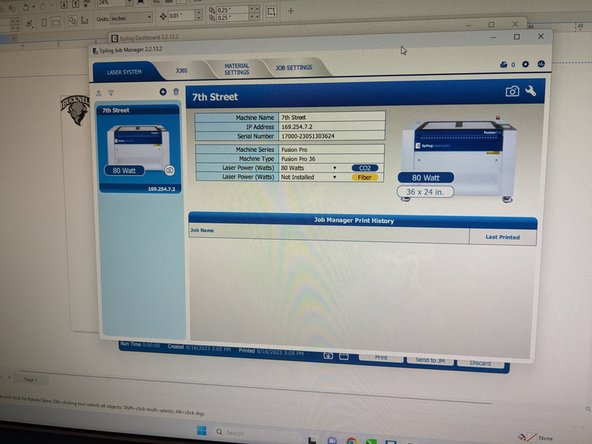
Keep the laser cutter name as "7th Street" and click "Finish" in the bottom left corner.
-
A new window will appear and your laser cutter is now set up.
-
-
-
Back on your computer, you are now ready to print your file.
-
Once you clicked "Print" in CorelDraw a new window should have popped up that is the Epilog Dashboard for the laser cutter.
-
Your image should appear as designed in your CorelDraw file.
-
This laser cutter is equipped with a camera allowing you to see exactly where your image is going to be located on the material you are working with.
-
-
-
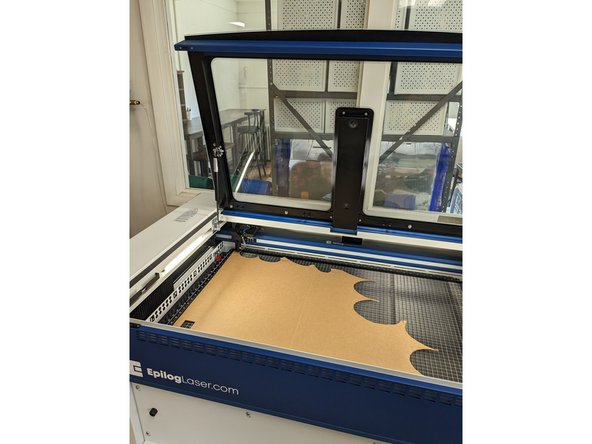
Locate the material you are working with for this cut/engrave.
-
Open the lid of the laser cutter and place your material so it is lined up with the top left corner of the laser cutter bed (you can place it elsewhere on the bed if need be (see next step).
-
Gently close the lid of the laser cutter.
-
-
-
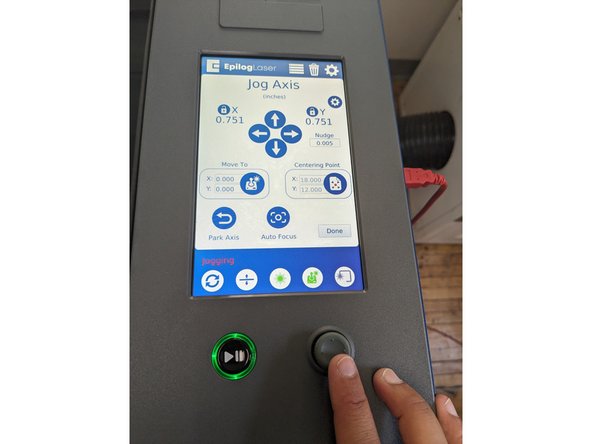
We must focus the laser cutter lens in order to correctly cut our material. This step will show you how to do this.
-
While looking at the touch screen on the laser cutter, click the 4th circle button in the bottom toolbar (the one that looks like a gaming control).
-
This will allow you to move the laser head around the laser cut bed.
-
Using the gray controller, move the laser cutter head so it is positioned approximately where you will be cutting your image out on the material. If your material is slightly bowed (meaning it comes up a bit higher in the middle), make sure the laser is centered over that area.
-
Click "Done".
-
-
-
Next, click on the second button in the bottom toolbar of the toolbar (this button has two arrows with a line in the middle).
-
Click on the button that says "Auto Focus".
-
The laser cutter head will now move up and down over the material to focus it.
-
Click "Done".
-
Your material is now focused.
-
-
-
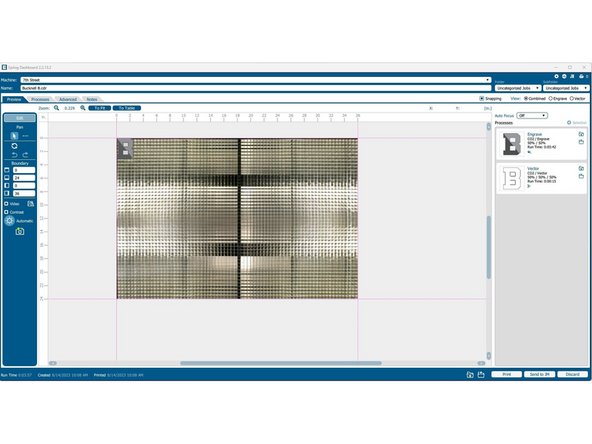
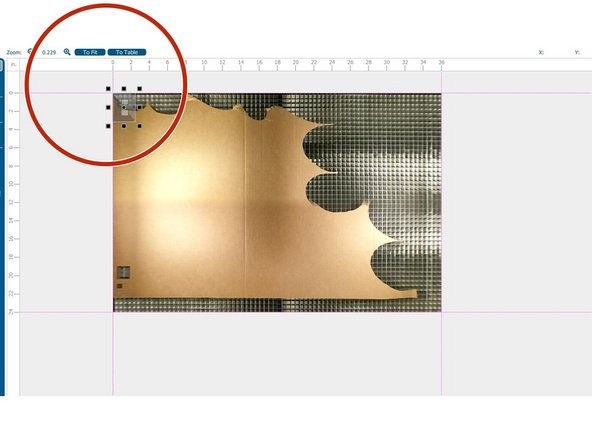
Back on the computer, in the Epilog Dashboard, you should now see the material you placed in the laser cutter underneath your image design.
-
If your image is located in a non-ideal position (such as off the material or where it would waste material), you can now click and drag your image to a more ideal spot.
-
-
-
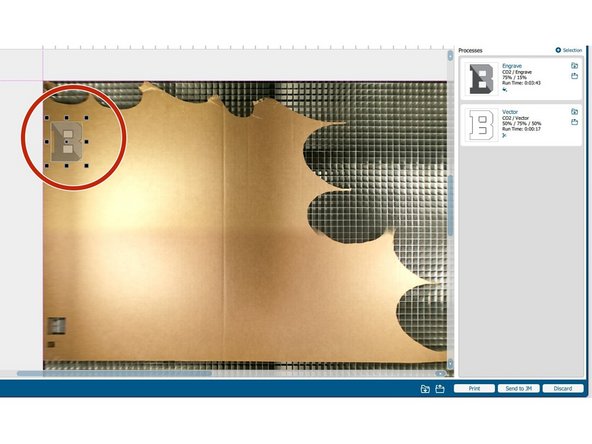
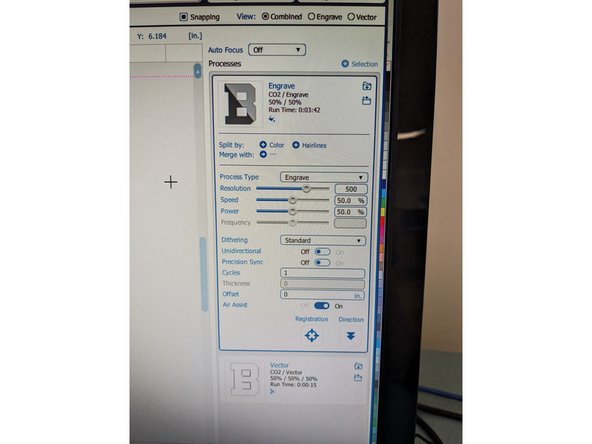
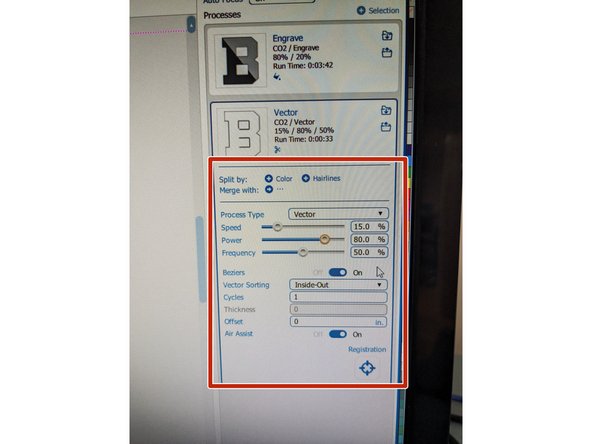
Now we are going to set the correct engraving settings for the material you are working with.
-
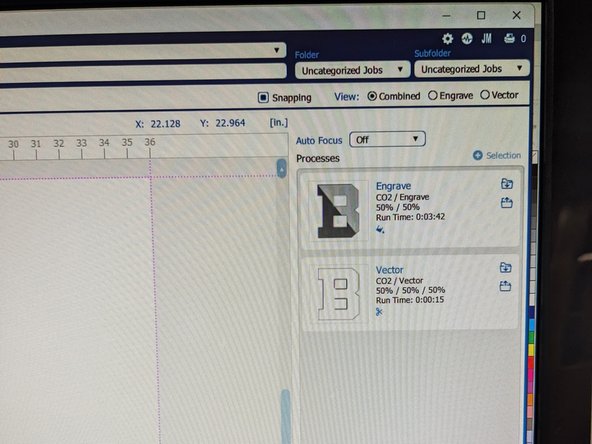
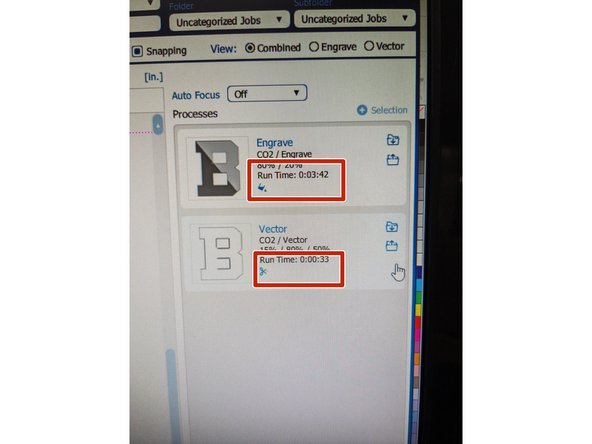
Since we are just engraving this image, your Processes should just say "Engrave". If it says anything else, please check with a student employee.
-
Click on the box that says Engrave.
-
-
-
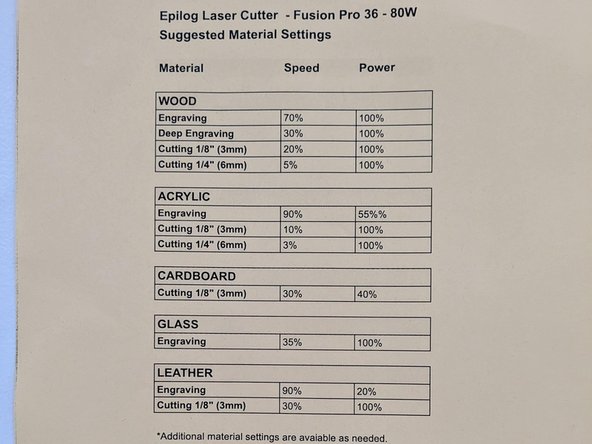
On the wall above the laser cutter computer, there is a list of settings based on material.
-
Input the Power and Speed settings for the material you are working with by inputting the % into the Speed and Power lines. Remember whether you are engraving or cutting.
-
It is crucial to select the correct settings for safety!
-
Note that you can also see how long the file will take to cut or engrave here. Under each of the processes, there is a section that says "Run Time". This is the amount of time it will take your file to complete.
-
-
-
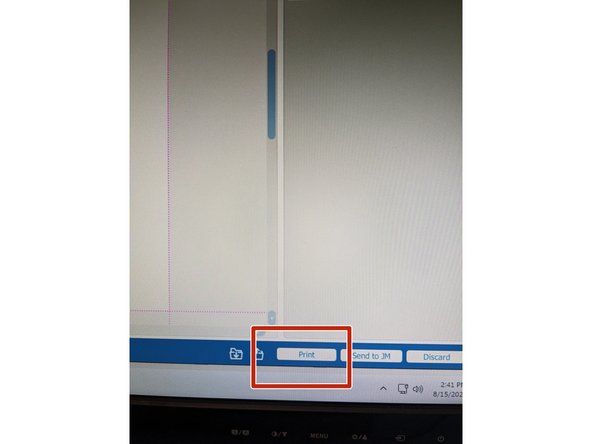
Once all Power and Speed settings are correct select the print button in the bottom right corner.
-
Your file has now been sent over to the laser cutter printer.
-
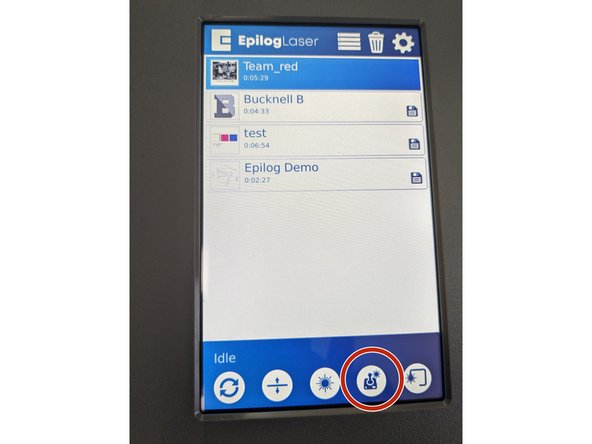
Please note this laser cutter does not save your file to the laser cutter. If you want to access your file again from the file laser ready format, in the Epilog Dashboard you can click the JM (Job Manager) button in the top right corner of the screen. This will pull up previous files sent to the laser cutter.
-
-
-
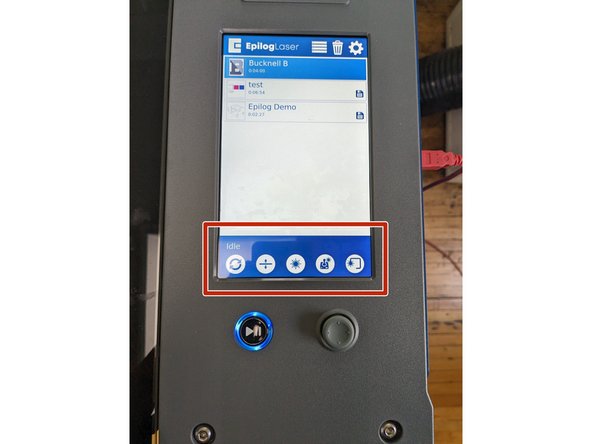
There are a few buttons at the bottom of this laser cutter screen to take note of. You may not need to use any of them but it is helpful to know.
-
The two arrows in a circle is the Park button. If you move the laser head at any point, clicking this button will bring the laser back to the original origin point in the top left corner of the laser bed.
-
The second button controls the focal distance of the laser cutter. This is what we set in an earlier step.
-
The middle button with the burst symbol will shoot a red laser point into your material. This is helpful when seeing where the laser is located.
-
The fourth button allows you to move the laser head around the bed.
-
The fifth button with the 3/4 square is the Tracing button. Clicking this button will provide a rectangle perimeter of where your image will be located on the material. If you click this, you must click it again to turn it off.
-
-
-
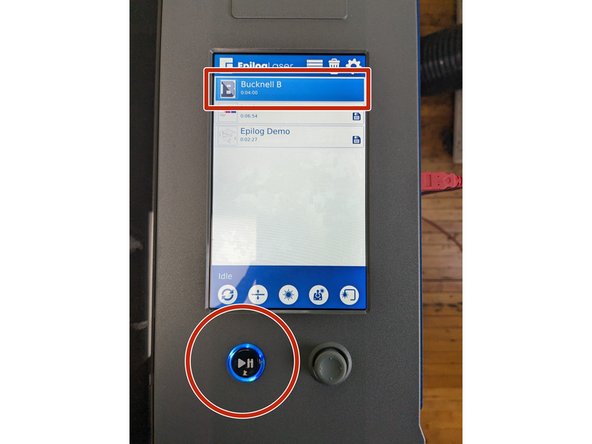
With your file selected, press the Play button on the machine. Your file will begin engraving/cutting.
-
*A small amount of smoke may appear when engraving/cutting. This is okay. If there is a large amount of smoke or any indication of fire, please contact a student employee.
-
Once the file is finished, the machine will beep.
-
Turn off the exhaust and turn the air pressure handle from the vertical position to horizontal.
-
Turn off the laser cutter by pressing the white off button on the right side of the machine.
-
Open the lid of the laser cutter and remove all materials.
-
-
-
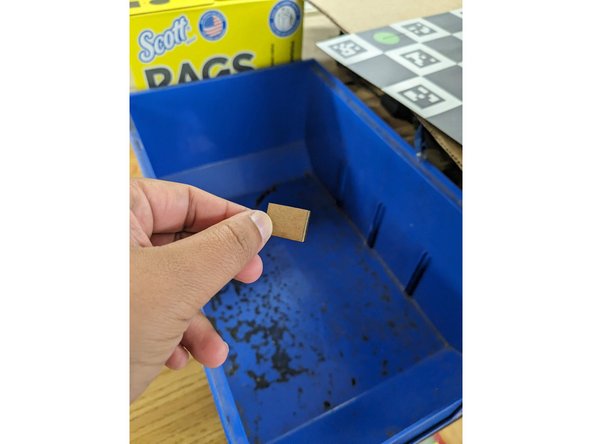
Small pieces can be discarded in the blue bin on top of the scrap materials or the recycling bin.
-
Larger materials can go back in the correct spot in the scraps drawer.
-
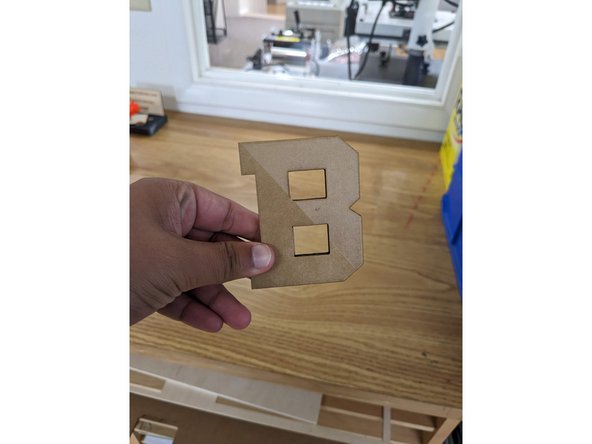
You are now all done laser cutting your file. Congrats! Please make sure your work station is cleaned up and everything is turned off.
-


Cancel: I did not complete this guide.
2 other people completed this guide.