
-
-
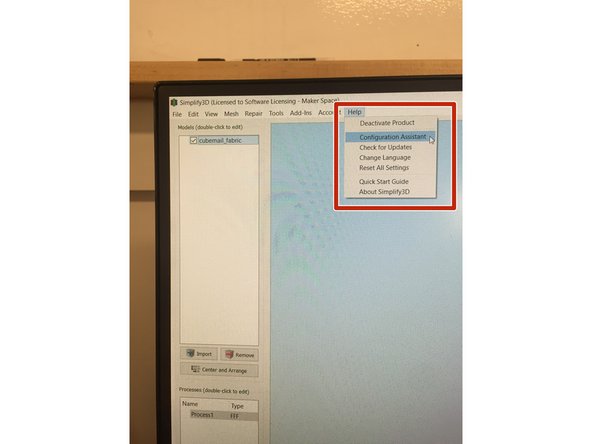
The easiest way to get a new fff profile in Simplify 3D is to go to "Help" in the top toolbar, then "Configuration Assistant", then select your printer.
-
7th Street Studio & MakerSpace uses the following printers: Lulzbot Mini, Lulzbot Taz 6 Single, Makergear M2 (24V V4 hotend).
-
If you wanted a shortcut to download and import these fff profiles follow the following links:
-
Makergear fff profile: bit.ly/2h9QNYc
-
Lulzbotz Taz fff profile: bit.ly/2xqGpRV
-
Lulzbot Mini fff profile (with supports): https://forum.simplify3d.com/download/fi...
-
-
-
What is an FFF profile?
-
The FFF profile is at the heart of the configuration of your machine and for controlling settings changes dependent on material, quality and extruders in use. - Simplify3D.com
-
Why is this important?
-
Each type of 3D printer has its own FFF profile. When printing, you want to make sure you are selecting the profile for the printer you are using to ensure your file will print correctly. The FFF profile contains settings including temperature, bed sizing, and more.
-
-
-
Simplify 3D already has hundreds of fff profiles located within the program for us to download. Follow the next steps to learn how to do so.
-
After opening Simplify 3D and importing your file go to the top toolbar and click "Help".
-
Then click "Configuration Assistance".
-
You must be signed in to get to this feature. Login information is located on the white board in the MakerSpace.
-
Once logged in scroll down until you find the 3D printer you are looking to print on.
-
Options in 7th Street Studio & MakerSpace include: Lulzbot Mini, Lulzbot Taz 6 Single, Makergear M2 (24V V4 hotend).
-
-
-
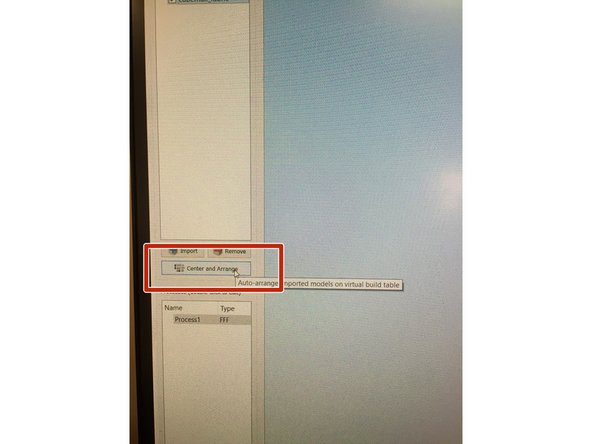
Once the new profile has been selected you are probably going to notice that the bed size on which your file is sitting on it going to shift in scale. This new size is the correct size of the 3D printer bed you are using so feel free to scale your object by double clicking on the object and scaling or centering by clicking "Center and Arrange".
-
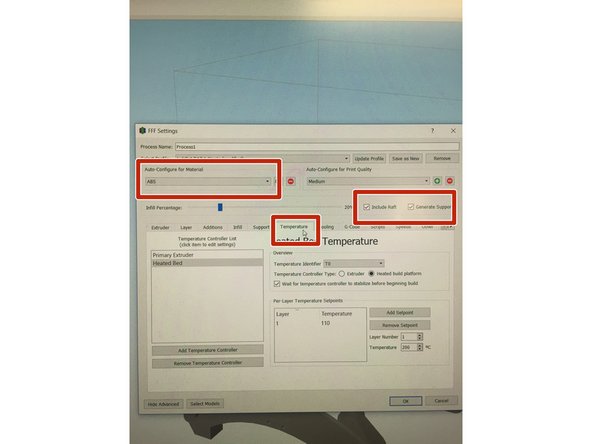
Now, click on "Edit Process Settings" to open the fff profile settings.
-
In this window, we are now able to add rafts and supports to our object by checking the boxes located next to the words "Raft" and "Supports".
-
Rafts are the bottom most layer that provides a support base for your object to print on. It is recommended to check this box.
-
Supports are pieces of filament incorporated into your print to essentially support the object you are printing. Objects that have an overhang of 45 degrees or greater need support. Supports are easy to remove with your hands but at times might require the assistance of pliers. You can also use Acetone to help smooth out any ridges.
-
Once you add your supports and raft, be sure to check your infill percentage so it is not higher than 20% , check that you are set up to the correct filament (ABS or PLA) depending on the filament located in the printer you are using, and double check temperature settings.
-
-
-
Once you have set up all of your fff profile settings and are satisfied with your object sizing and centering you are ready to print.
-
If you added supports, you won't see them on your file until we go to prepare our file to print.
-
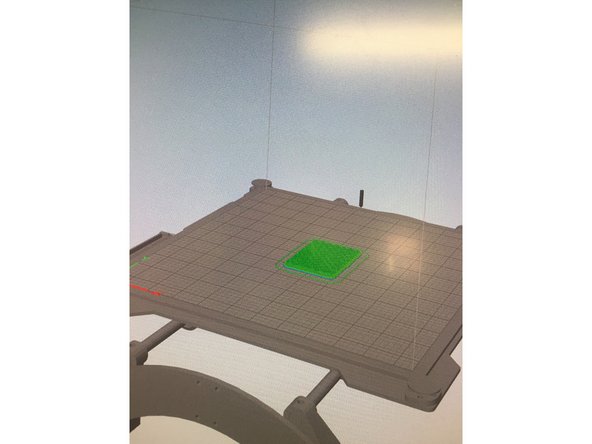
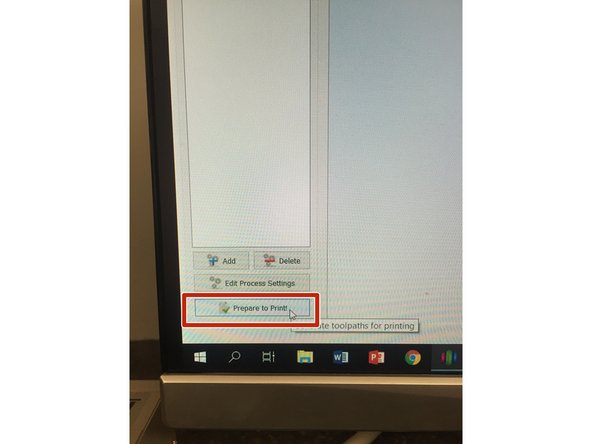
In the bottom left corner of the Simplify 3D program, select "Prepare to Print".
-
You should now see your object in one color surrounded by rafts and supports in another color.
-
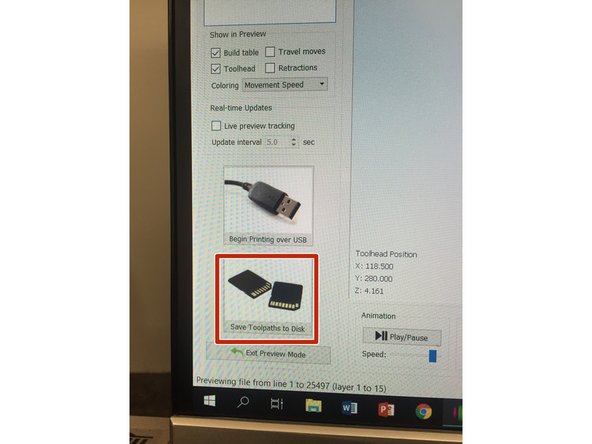
If everything looks right, you are now going to save your file.
-
If you are printing on the Makergears or Lulzbot Taz, you must pop an SD Card into the computer to save your file. Lulzbot Mini files can be saved directly to the computer.
-
Click the "Save to SD Card" icon in the bottom left corner and then save your file as a .gcode onto the SD Card (makergears and lulzbot taz) or computer itself (Lulzbot mini).
-
-
-
Now that your file is saved, you are ready to print!
-
For Makergears and the Lulzbot Taz, you are going to put your SD Card into the 3D printer and then follow the steps in those tutorials on how to print.
-
For the Lulzbot Minis, on the computer you are going to open the Octoprint file (an icon on your desktop) that corresponds with the printer you want to use. Each printer is labeled with a number.
-
Once open, proceed as you would if you were uploading an .stl file. For .gcodes, the file will be saved to the queue on the left so you will need to go in and press the printer icon.
-
For more information on how to finalize printing steps please reference the specific machine tutorials!
-


Cancel: I did not complete this guide.
7 other people completed this guide.