Introduction
The lighted sign is made of acrylic that sits in a 3D printed base. Lighting is provided by a Circuit Playground board programmed with Circuit Python. This guide steps you through how to build the lighted sign.
-
-
Before you begin you will need four items: the Circuit Playground Express (CPX) board, a micro USB cable, a computer with a USB port, version 6 of Circuit Python, and if you want to change the software an editor called Mu.
-
You can download Mu from this link.
-
In the next step we'll download Circuit Python and get the board set up.
-
-
-
The CPX board comes installed with Circuit Python, but it is always a good idea to update it to the latest version. This section walks you through the steps of installing the latest version.
-
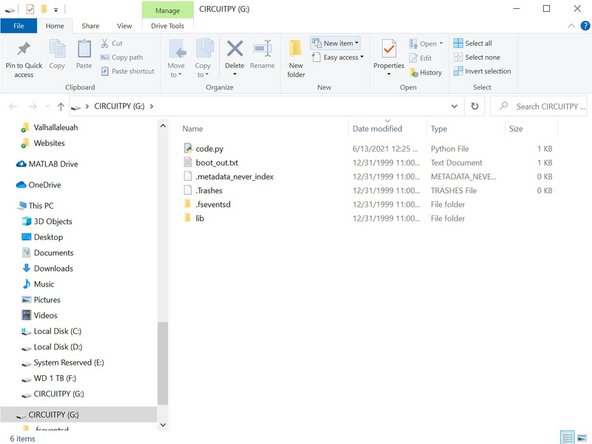
First connect the CPX board to a USB port on your computer using the cable. You should see a new drive (like a thumb drive) pop up.
-
First thing we are going to do it update the board with new software in case what is installed in out of date. First download the bootloader file . You want version 3.13.0.
-
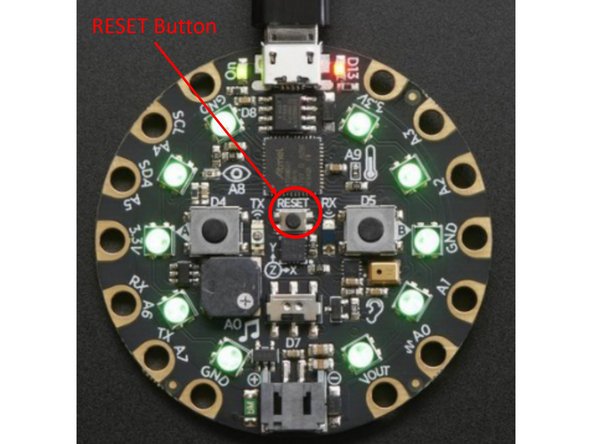
Next double click the reset button in the middle of the CPX board, the lights should turn green. The timing is little tricky so if it doesn't work at first try again.
-
Once the lights are green drag the .uf2 file you just downloaded into the window displaying the contents of the drive. The lights should flash and you should see the contents of the drive change to the second image.
-
...Adafruit has more detailed instructions about installing bootloaders here on their pages detailing the CPX board.
-
-
-
The next step is to install Circuit Python which will allow code to run on the CPX board.
-
Download version 6.3.0 of Circuit Python from this site. It will be another .UF2 file which you will simply drag onto the drive like you did in the previous step. Alternatively get the .UF2 file directly from this link.
-
The content of the drive will change and should look like the image if Circuit Python installs correctly.
-
-
-
You aren't going to be able to do very much until you can edit code and install the libraries the code needs to run. The first step is to install a code editor - one that works well for Circuit Python in Mu.
-
If you haven't already, download Mu from this site and install it.
-
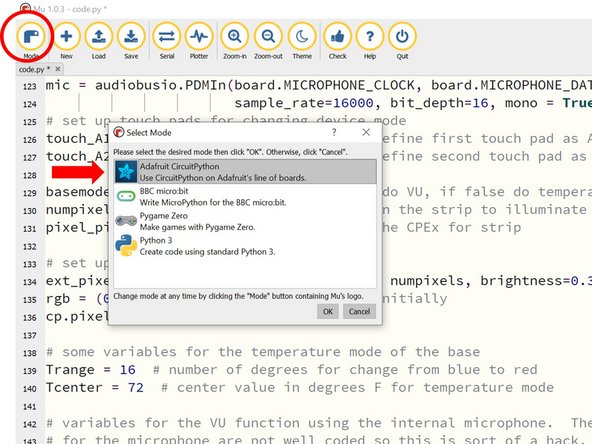
The first thing to do is tell Mu that you are using Adafruit Circuit Python by clicking the Mode button in the upper left.
-
Next load the "code.py" file in the CPX drive that opened up when you plugged the board into your computer.
-
-
-
You are now ready to download the code for the lighted sign application. Download the text file lighted_sign.txt from Google Drive.
-
Next make a copy of the file and rename it code.py. Drag the code.py file you just created to the root folder of the CPX board drive, replacing the file that is there.
-
The code runs several ways. It will run automatically if you push the reset button (once) or unplug then reconnect the board. You can also run the code by saving it from Mu, which you will need to do if you decide to make any changes.
-
Hit the reset button once. The lights on the board near the USB connector should blink then all the lights on the board light up. The next steps will describe the code and take you on a tour of some features .
-
-
-
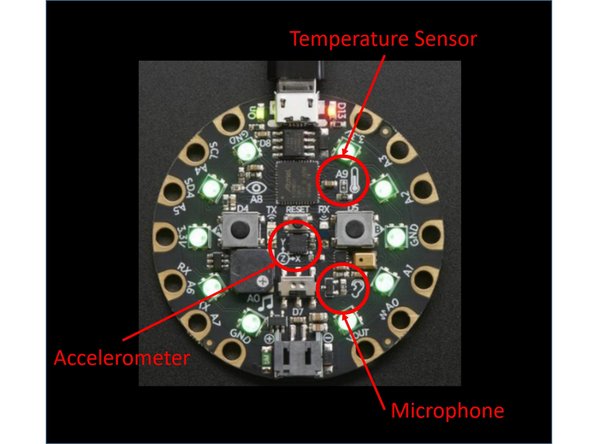
Adafruit has a nice writeup on the CPX board which can be found here. As you can see the board integrates a lot of different sensors.
-
The application for the lighted sign uses four of those sensors: 1) capacitive touch sensors A1 and A2, 2) the on-board microphone as a VU meter, and 3) the onboard temperature sensor to display a base color that changes with the temperature, and 4) an on-board accelerometer that is used to set the sign color.
-
These will be described next which describes how to customize the light once the code is running.
-
-
-
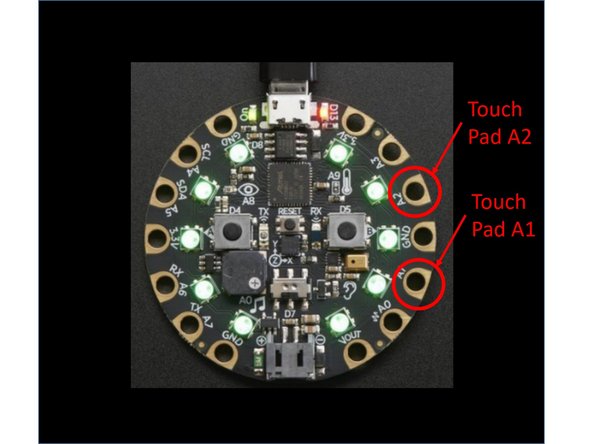
Any of the eight pads around the perimeter of the board (A0-A7) can be used as a touch sensor. Here A1 is used to set the color of the sign while A2 is used to select the mode of the perimeter lights on the CPX board: either VU meter or temperature sensor.
-
As long as pad A1 (or any wire connected to A1) is being touched the program goes into a mode to select the color of the lights for the sign. This is described next when discussing the accelerometer.
-
Every time pad A2 is touched it switches the mode of the base lights from either measuring temperature or as a VU meter which measures sound pressure level and changes the light color based on the sound level.
-
If you want to learn more about the capacitive touch sensors and get an example of some code to explore these more, this page provides more details.
-
-
-
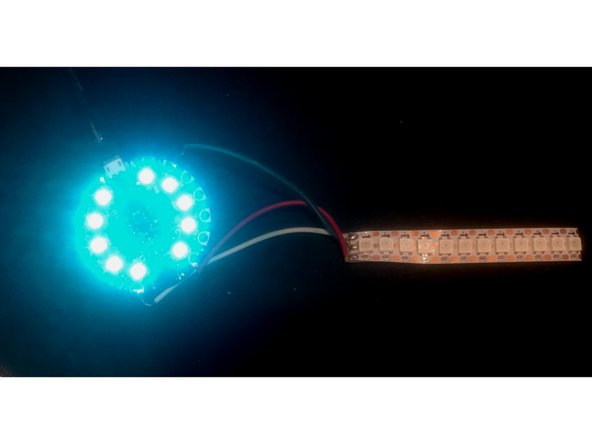
In the code that is provided the on-board accelerometer is used to set the sign color by sensing the orientation of the board relative to the acceleration of gravity (straight down) as long as pad A1 is being touched.
-
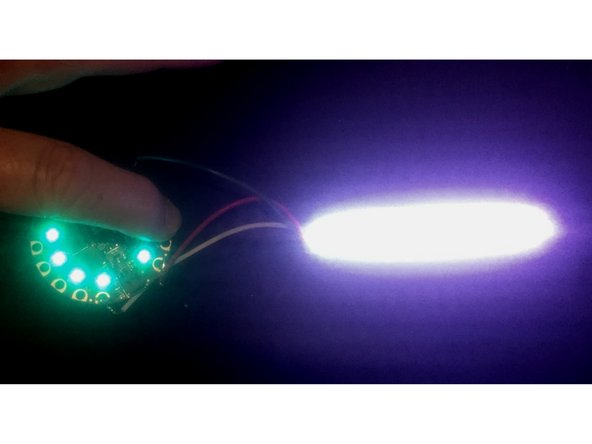
The first figure shows the board with the unlighted neopixel strip since pad A1 has not been touched.
-
If the board is flat (so the force of gravity is normal to the board surface) the lights will be white. If the board is tilted on edge the lights will be a single color. The second image is the flat board with a touch on A1.
-
The color chosen when the board is on edge depends on the angle of the board (think of the face of a clock). When the USB connector is straight up the lights are cyan and when the connector is down the lights are pink. Other colors correspond to different angles.
-
When A1 ceases to detect a touch the color of the lights will be set and remain constant until A1 is touched again.
-
If you would like to play with the accelerometer and code check out this page on this CPX sensor.
-
-
-
When the CPX board powers on it is in temperature sensing mode by default. The colors indicate the temperature from blue (cold) to red (hot).
-
The temperature range is plus or minus eight degrees Fahrenheit with the center point (green lights) at 72 degrees F.
-
In the code the variables "Trange" and "Tcenter" can be modified to change this range.
-
The video shows how the perimeter lights change when a finger is pressed on the temperature sensor.
-
-
-
Touching pad A2 will shift from temperature to VU mode which uses the onboard microphone to measure sound pressure level.
-
The microphone feature is not well supported and the VU meter is somewhat sensitive to noise.
-
On powerup the board will measure a background sound level, then compare the sound level in the environment to the background level. The color and brightness of the perimeter LEDs changes as the sound level increases.
-
Four variables are used in the code to control the behavior of the VU meter.
-
VUavgs is the number of averages taken, more averages give less noise but slow down the response time.
-
VUpower takes the measured sound level and raises it to a power. Large numbers for VUpower give "twitchy" behavior, numbers less than one give more relaxed behavior.
-
VUNorm adjusts the overall reading, higher numbers make the system less sensitive.
-
VUbright controls the brightness response. Large numbers reduce the brightness, small numbers increase it.
-
-
-
The CPX board has a lot more functions you can play with. You can also write your own code to customize, modify, or even completely redo the behavior of the lighted sign. Below are several resources to get you started.
-
Writing code using blocks: One of the easiest ways to write code if you are not familiar with programming is to use a visual block editor that lets you drag and drop functions. Here is one for the CPX board. The page has a lot of fun examples to get you started.
-
The code in this guide is written in CircuitPython. Python is a powerful language that is very common for many coding applications. Adafruit's CircuitPython Guide will walk you through how to use set up and start using CircuitPython.
-
If you are more interested in learning the CircuitPython language, Adafruit has this guide for beginners.
-
Adafruit also offers the following guide to accessing sensors and other features on the CPX board using CircuitPython. There are lots of blocks of example code you can download and play with.
-